I’ve only gone and done it again. Here’s the next video in my new, exciting kind-of-a-podcast-I-guess-but-not-really series of ‘Everything Matt Knows About…’. Except I’ve dropped the subtitle on the video itself because I don’t actually ‘know’ anything in this domain, it’s 95% opinions. In this one, I try and identify what gaming has over other medium for purposes of providing engaging narrative. Transcription is below.
Story Structure: Everything Thing Matt Knows About…
Above, you can see the first instalment in my new, exciting kind-of-a-podcast-I-guess-but-not-really series of ‘Everything Matt Knows About…’. For the opening episode, I rant about story structure for about 30 minutes. If you don’t want to listen to me drone on for that long, the transcription is below.
Fic – A Z-Code Interpreter
I wrote a bit about interactive fiction (IF) before on this blog – this time I want to talk a bit about how these games ticked and about an interpreter I wrote for them. If you haven’t read that, I recommend giving it a quick skim before reading this one, unless you’re already familiar with the genre.
Infocom
Back when interactive fiction first became a thing in the 70s, it was immediately a huge hit. Multiple companies sprung up to produce the stuff, including one called Infocom. I was remiss in my previous post in not mentioning them explicitly, but it’s time to set that wrong right. Infocom were responsible for games such as Zork, its many sequels, the official Hitchhiker’s Guide To The Galaxy text adventure, and many others. Like all companies, they held great interest in selling as much software as possible. In the 70s, 80s, and 90s, home computing wasn’t nearly as homogeneous as it is today. Now, we’ve basically settled on architectures based around the Windows, Linux (POSIX, if you want to be more accurate), and Macintosh operating systems. These in turn are built on top of hardware architectures such as the x86 or x64 instruction sets. But way back when, if you wanted to publish software on multiple different types of machine, this meant writing that software from scratch over and over again.
Virtual Machines
Naturally, companies were always looking for ways to cut down on development costs, and Infocom’s solution was to develop a so-called virtual machine. What I’m about to describe is not unique to interactive fiction – indeed, different types of virtual machine existed before the advent of IF. Many exist now – you only need to look as far as your favourite Java application to see an example of a virtual machine in action, as Java applications themselves run through software called a JVM (the appropriately named Java Virtual Machine).
A virtual machine is a program that takes as input compiled ‘bytecode’, and runs this code in the same way that a processor would run machine code. The genius of the virtual machine is that bytecode is portable. Provided a virtual machine exists for your target platform that is capable of running your bytecode, you can write the bytecode once and immediately be able to publish to that platform without thinking about the platform’s specific architecture. For instance, 24 games were written for version 3 of Infocom’s virtual machine, with virtual machine software developed for 15+ different platforms. So instead of having to write (24*15) 360 versions of their software, they needed to only produce the 15 virtual machines and the 24 games. So clearly the benefits of a virtual machine grow as you produce more software for it.
A virtual machine’s complexity could be measured in the number of ‘instructions’ it implements. For instance, one could imagine a basic virtual machine that takes as input compiled bytecode representing arithmetical expressions. The instruction set for a (very, very weak) machine might look like:
push number - push a number to the stack
pop         - pop the top number of the stack
add         - add all the numbers on the stack together, pop them, and push the result
subtract    - subtract the numbers on the stack from each other, pop them, and push the result
multiply    - multiply all the numbers on the stack together, pop them, and push the result
divide      - divide all the numbers on the stack using the oldest stack values as numerators first, pop them, and push the result
print       - print the result
Implementing such a virtual machine would be trivial – there’s no complicated input or output routines, nor graphical components. Indeed, the only output operation listed is for printing results. An example program would then look like:
# Add 3 to 4, then multiply by 2 and print the result
push 3   # (stack: 3)
push 4   # (stack: 3, 4)
add      # (stack: 7)
push 2   # (stack: 7, 2)
multiply # (stack: 14)
print    # prints 14
An actual program would be represented as some form of bytecode instead, rather than in text as above. Again, for example, a mapping between the instruction set and the bytecode:
push number -> 0x01 <number as byte>
pop         -> 0x02
add         -> 0x03
subtract    -> 0x04
multiply    -> 0x05
divide      -> 0x06
print       -> 0x07
Which would make the above example code look like:
0x01 0x03 # push 3
0x01 0x04 # push 4
0x03      # add
0x01 0x02 # push 2
0x05      # mulitply
0x07      # print
Pretty simple, right? An interpreter would load a file like the above, examine a byte to determine what to do, and then perform that action before looking at the next instruction and starting again. We’ll talk about this loop later on. For another source on bytecode, you can checkout the Wikipedia article.
The Z-Machine
Infocom’s virtual machine is called the Z-Machine. They produced six different versions of it, each one adding significant complexity on top of the last. Five of them can be considered truly portable – you can take any game from those five generations and run them on any of the target architectures with a compatible virtual machine. The sixth version introduced graphics (!), and dropped the ‘write once, run anywhere’ philosophy for the game files themselves, with some changes necessary in the games themselves depending on the target architecture.
The instructions included in the Z-Machine are largely general purpose – there are very few specific to the genre of Interactive Fiction. All of the logic when it comes to interpreting player input and deciding what to print and when rests with the game code. For someone implementing a Z-Machine, their task is relatively simple – they need only implement around 60 instructions in order to support version 3 of the Z-Machine, and another 40 or so to support versions 4 and 5. Granted, some of these instructions are more complicated than others, and the implementer needs to understand the underlying architecture as well – things like how the object tables work, and how routines and instructions encoded. But as the implementer works through programming each instruction, they will end up having to develop the architecture as well.
Here’s a few (simplified) instructions implemented by the Z-Machine:
# @Var = Variable
# @Dest = Destination address for storage or jump
# #Num = Number literal
# @@Vals = Vargs - some number of variables

je @Var @@Vals @Dest      # Compare @Var to all @@Vals and jump to @Dest if any @@Vals is equal to @Var
store @DestVar @SourceVar # Store @SourceVar in variable @DestVar (@SourceVar can also be a #Num)
get_prop @Var #Num @Dest  # Get the #Num'th property of object @Var and store it in @Dest
inc @Var                  # Read the value in @Var, increment it, and store it in @Var
verify                    # Verify the game file by calculating a checksum and comparing it to a value in the file's header
random @Var @Dest         # Generate a random number between 0 and @Var and put the result in @Dest
As you can see, some instructions are simple enough to implement (store, je), while others (get_prop, verify) require a more in-depth understanding of the memory map and game file format.
For a more thorough history of the Z-Machine, please refer to this page compiled by Graham Nelson and others. In fact, that entire site is extremely useful as a reference for those implementing the Z-Machine, as it includes a full copy of the instruction table and an in-depth explanation of the architecture. The site proved invaluable when I was developing my own Z-Machine.
Fic
Fic is a V3 Z-Machine that I’ve written in Python, with the goal of eventually expanding up to V5. In a manner of speaking, this could make it a kind of meta-virtual machine, as Python itself is an interpreted language (distinct from a bytecode compiled language like Z-Code) which runs on any machine with a Python interpreter and appropriate libraries installed.
Rather than stand out as an engineering marvel, Fic exists to demonstrate how one may naively implement V3 Z-Machine in only a couple of thousand lines of code. Taking the time to properly architecture the code could cut this down dramatically – this is my next task now I have a working implementation.
So how do you go about writing one of these things? It turns out it’s surprisingly simple! Rather than go through the whole implementation, I’ll hit the key points:
- Loading a game file
- Determining where the program starts
- Decoding an instruction
- The program loop
Once this architecture is place, the ‘only’ work left is to implement all of the instructions!
Memory – Loading a game file
First, you need to load the game file into memory. As we’ll be dealing with bytecode, Python’s default open/read combo is sufficient:
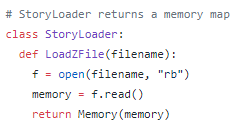
The StoryLoader returns an instance of the Memory class. Memory is used to store the raw game data, as well as to provide easy access to the header elements. In the current incarnation of Fic, it’s also the ‘God’ class – it contains logic it shouldn’t should be refactored at some point.
The Header – Determining where the program starts among other things
Once you’ve loaded the game into memory, it’s time to do some basic housekeeping:
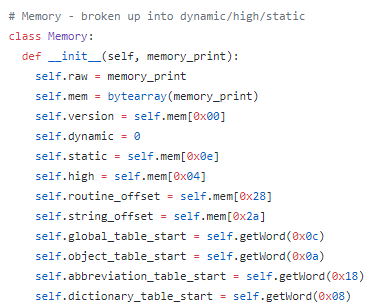
We keep a binary-string representation of the memory stored for special purposes like file verification, but more importantly we also keep a byte-array version of the data.
To start with, we can use this byte-array to read various header values and store them for convenience. This includes things like the version of Z-Machine being used (first byte, 0x00), the start locations of static and high memory (0x0e, 0x04), and where the dictionary table starts (a two-byte value called a word, stored at 0x08). At 0x06 (not pictured), the address of the first instruction resides. This last one is important, as it is our entry point into the program, and we will use it later to start the main loop.
Instructions & Decoding them
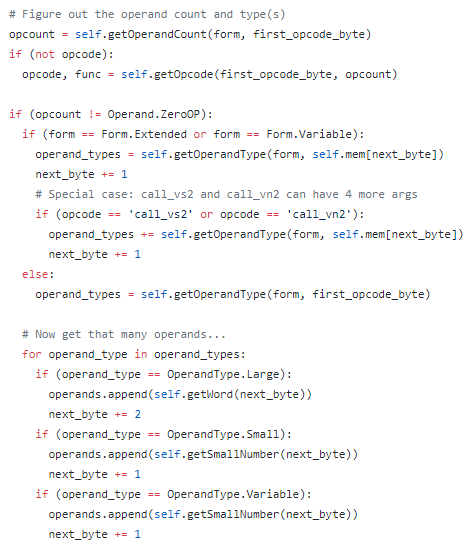
Instructions in the Z-Machine take the form of an ‘opcode’ (operation code), with zero or more arguments. In addition, if the opcode is used for branching, storage or printing text-literals, an additional parameter is provided to give the branch offset or storage location respectively. An instruction ranges from being a single byte long (0OP with no branch or storage, like verify) to unlimited (print opcodes with arbitrary length strings), although the longest non-print instruction can run up against 22 bytes. Opcodes are broken down into 4 categories in V3: 2-operand, 1-operand, 0-operand, and variable-operand. The opcode is determined by examining the contents of the first one or bytes, followed by determining the types of operands, the operands themselves, and the store/branch/text value (if any). This can get a bit complicated – see this little snippet from the getInstruction function that gets the operand types and operands themselves:
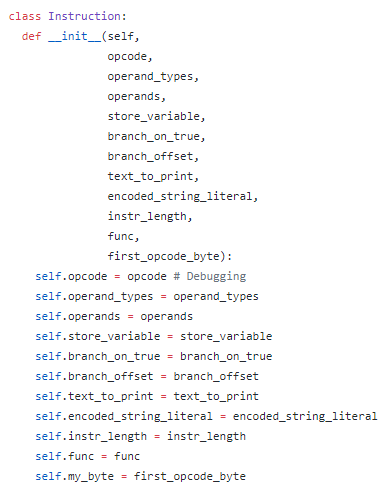
In addition to storing the obvious (opcode, operands, etc.), it’s also important to store meta-data about the instruction, whether for practical or debugging purposes. For instance, it is important to know the length of an instruction in order to correctly place the program counter after running the instruction. Here’s what the Instruction class looks like. A call to getInstruction will return one of these when provided an address.
The Main Loop and Program Counter
Now for the easy bit. We know the address where the program begins thanks to the file’s header. We also have a function for determining the instruction to run when given an address. So we set the program counter of the interpreter to this address, and kick off the main loop:
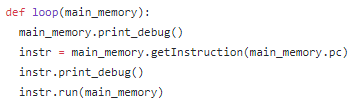
If you ignore the debug statements, the loop body is two lines long! How does this work? Well, first we fetch the instruction pointed to by the ‘pc’ variable, which refers to the program counter. We then run that instruction. Each instruction will affect the program counter in one of two ways:
- It will increment the program counter by its own length, thereby pointing to the next instruction for the next loop iteration, or…
- It will manipulate the program counter directly, either setting it to a specific value (in cases of function calls or return statements), or adding/subtracting some offset value (in cases of jump instructions).
In other words – the end result of the loop is that the program counter is pointing at a new instruction, so the loop can begin again from the top. This will continue until the program triggers an opcode to end the game (or the user sends an interrupt to kill Python).
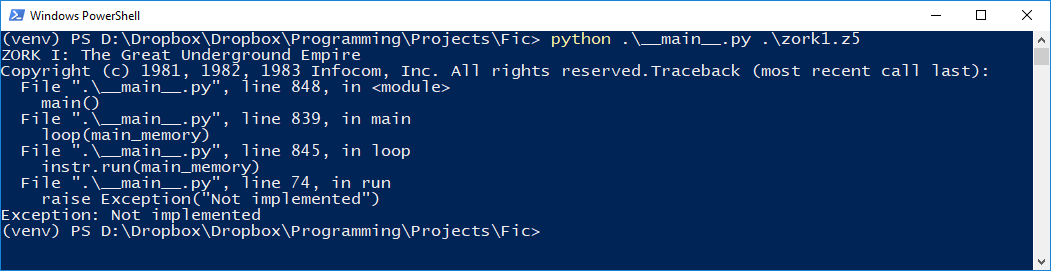
Now what?
If you review my first commit on Fic, the above is all I implemented to start with. With this in place, I took the naive approach. I used Fic to run Zork 1. Of course, it failed – I didn’t implement any opcodes! Any attempt to run an opcode that was not yet implemented triggered an exception (“Not implemented”), meaning I had more work to do. Implementing an instruction is easy enough if the architecture is in place – I just have to define a function inside the Memory class that takes an instruction as a parameter that manipulates the memory accordingly. For example:
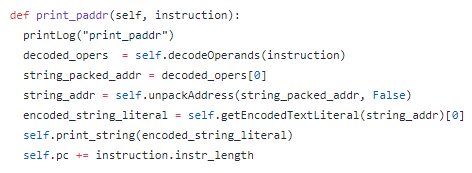
This is what the print_paddr instruction implementation looks like. All of the heavy lifting logic is abstracted out, but the idea is clear. First, get the decoded operands from the instruction. Then, the first operand is the location of the string literal we want to print. However, it is offset by some amount, so we first unpack the address. Then, we can fetch the string literal at that address, and finally (!) we can print it to the screen. As is normal, we then set the program counter to be after this instruction.
So I implemented these opcodes, over and over, learning more about the Z-Machine architecture with each one. For instance, the first few opcodes used in Zork 1 are ‘call‘, ‘add‘, and ‘je‘ – immediately, with call, a would-be implementer is thrown in at the deep end, and must learn how to implement routines and the call stack. With je, the implementer must understand Z-Machine branching behaviour. After some persevering, the code reached a stage where it would print one of the opening lines of the game!
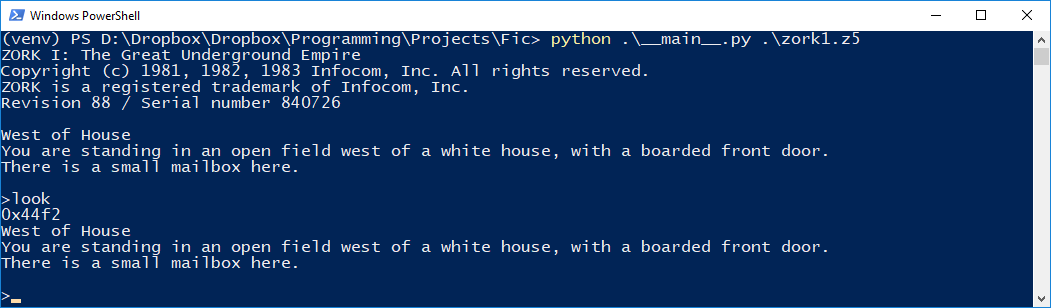
And after a few more commits, we had the command prompt (with some debug strings hanging around)…
And after a year of on-and-off work (okay, fine, maybe ten days of actual effort if you look at the commit history):
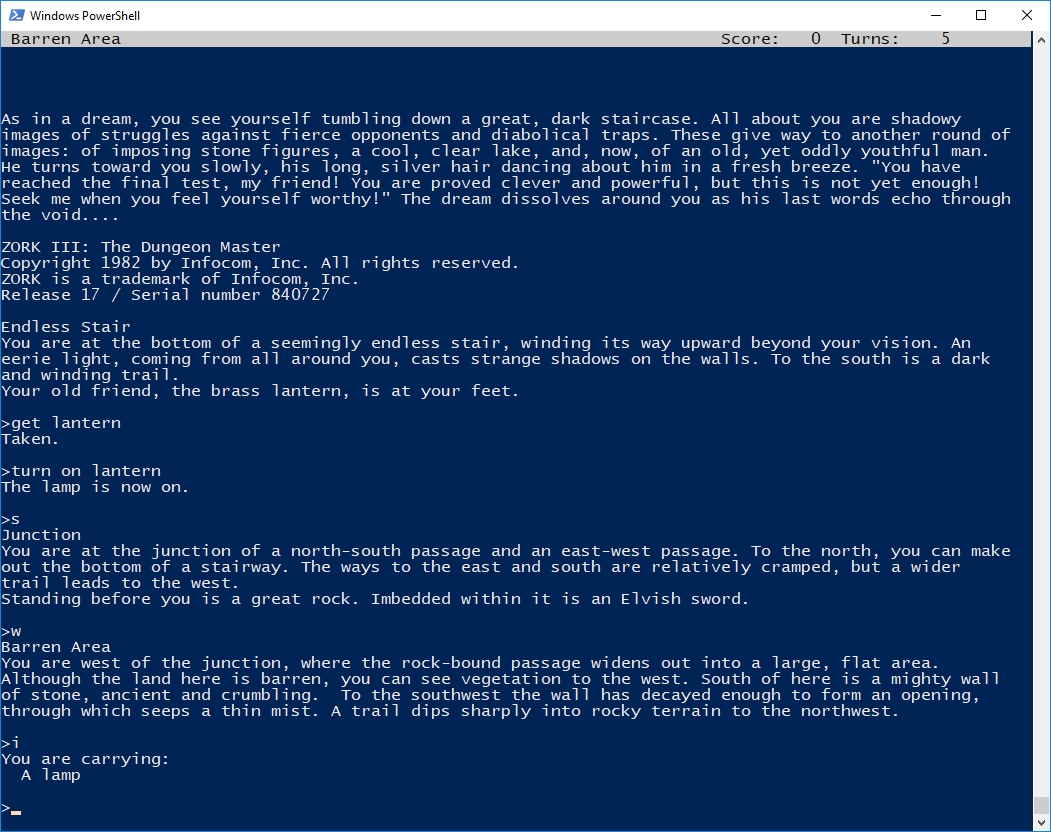
This is Fic running Zork 3. Note the fancy status bar at the top of the screen, the lack of random debug strings or text bugs..! If I’ve done my job right, it should be possible to reach the end of the game as the developer intended with none of those nasty ‘Not implemented’ errors or random crashes.
That’s it!
I encourage you to take a look at the source for Fic if you’re interested in how a novice in virtual machines might go about implementing a simple one. A few warnings before you go looking:
- It’s untidy and need of refactoring – the sole source file is 2k SLOC.
- It’s incomplete – some non-mandatory V3 instructions are missing.
- There are omissions and likely errors in how the specification is meant to be followed, so if you’re using it as an example of how the Z-Machine should be implemented… don’t! Instead, look at WinFrotz or something similar.
Thanks for reading – I hope you found it interesting!
Objection! – Voice Control for Phoenix Wright: Ace Attorney Trilogy
It’s only been four years, but I’m itching to write another blog post. This one won’t be long – I just want to spend a bit of time talking about how I got voice control working for a recently (re-)released video game called Phoenix Wright: Ace Attorney Trilogy. Here’s a video that will mean nothing to you if you didn’t understand any of those words (yet):
Phoenix Who?
A bit of history for the uninitiated. The Ace Attorney game series is a long-running staple of developer Capcom, focused around the trials and tribulations (hehe) of colourful, fictional lawyers. The first three games in series revolve around Phoenix Wright, a junior lawyer at the Fey & Co. law firm. Released on the Game Boy Advance, gameplay consisted of alternating sequences of gathering evidence and fighting cases in court.

Ace Attorney is actually a disguised example of the visual novel genre: the game does not involve platforming, simulation, shooting, or RPG elements. Instead, the game is played by reading through many, many text boxes, punctuated with player input in the form of finding clues, choosing dialogue responses, and working out which piece of evidence to present or which piece of testimony to question. It’s been quite successful and has spawned 10 games so far, with lead character Phoenix Wright appearing as a playable character in the similarly long-running Marvel vs. Capcom fighting game series.
Objection!

But what has voice control got to do with it? Well, when Phoenix Wright was first re-released on the Nintendo DS, Capcom was keen on capitalising on the DS’ unique functionalities: in addition to spreading the game out across both screens, it also took advantage of the bottom touch screen and (here we go) the microphone built-in to the device. Usage of the last item was purely optional, but if a player wanted to feel more like legendary lawyer Phoenix Wright, they could hold a button to activate the microphone and say (or shout, if they were doing it properly!) one of the three key-phrases recognised by the game: “Objection!”, “Take That!”, and “Hold It!”
When used at the appropriate time, this triggered the corresponding action in the game. “Objection!” would present evidence that contradicts a witness’ statement, “Take That!” would do the same in support of your own statements, and “Hold It!” is used to press a witness for more information on one of their statements.
Of course, each of these actions mapped to a button on keypad as well, and it was always faster to press the button. But where’s the fun in that?! Unfortunately, it seems that Capcom decided to move away from the microphone gimmick in all subsequent re-releases, likely because most of the consoles it was released on did not have native microphone support without the purchase of a peripheral.
This includes the latest round of re-releases on Switch, XBox One, PlayStation 4 and PC. But that last one – the PC… Perhaps there’s some hope? Perhaps some nostalgic software engineer with too much free time will come to the rescue and develop the hackiest hack that has ever hacked? Will enterprising digital lawyers be able to scream ‘Objection!’ at the top of their lungs once more?
The Script
Of course they will. Armed with the knowledge you now have, you can finally appreciate the technological marvel at the top of the page. But how does it work? In fact, it was very simple. With the current state of software, it’s easier than ever to cobble together simple scripts that leverage existing libraries to great effect. The Objection! Python script is the combination of two libraries – one that manages detecting the key-phrases spoken into a microphone, and another that sends key presses to the game. The former is generally called a ‘wake word’ engine, and the latter is known as GUI automation. The total code in the script doesn’t even hit a hundred lines, and if you threw a competent programmer at it, you could probably halve it to fifty or so. The script runs in the background while the user plays the game, waiting for them to activate it through a wake word.
Wake Words

If you own an Amazon Echo, you already know what a wake word is. The purpose of a wake word is to tell a computer system that you’re about to address it. For instance, the default wake word for an Echo is ‘Alexa’. For Android phones, it’s ‘OK Google’. For an iPhone, it’s ‘Siri’. The words are carefully chosen as to not come up in natural speech (unless you happen to know a Siri, or an Alexa. Hopefully you don’t know anyone named ‘OK Google’, but the future is still young…).
Once a wake word is spoken, the device will then listen for additional input and then send it off to the cloud to be processed. But the crucial difference between the input that follows a wake word and a wake word itself is that wake words can be processed without an internet connection. This serves multiple purposes: one, it protects your privacy. The device is always listening, but only for the wake word. Only after the wake word is spoken will you be recorded. Two, it saves an incredible amount of money in processing power and bandwidth. Imagine everything you said had to be uploaded to the cloud for processing! The costs would be enormous, and the strain on the cloud would be immense.
For my script, it was not necessary to capture additional input after the wake words. It was enough that the wake words could be detected and the window automation triggered. Several wake word engines exist for non-commercial use. I investigated three: PocketSphinx, Snowboy, and Porcupine. Of the three, I ended up using Porcupine. PocketSphinx isn’t so much wake word-oriented as it is towards general speech processing, which is cool, but on review ultimately seemed a bit complicated to integrate for the use case. Snowboy seemed very promising, but isn’t supported for Windows. This left Porcupine, which in my experience has been extremely simple to use. The only downside is that, even for non-commercial use, Porcupine’s wake word definition files expire after 90 days and must be regenerated with their closed-source tool. Fortunately, I intend to finish the game within that time-frame..! If I were to revisit the project, I would take a longer look at PocketSphinx.
Here’s a snippet of how I use Porcupine (heavily stolen influenced by their demo code):
def run():
    try:
        while True: # Forever...
            pcm = audio_stream.read(porcupine.frame_length, exception_on_overflow=False) # Read from the microphone
            pcm = struct.unpack_from("h" * porcupine.frame_length, pcm) # Put it into a format Porcupine understands

            result = porcupine.process(pcm) # Feed Porcupine the audio data, and trigger an action if one is detected
            if result == OBJECTION:
                print("OBJECTION!")
                objection()
            if result == TAKE_THAT:
                print("TAKE THAT!")
                takethat()
            if result == HOLD_IT:
                print("HOLD IT!")
                holdit()
GUI Automation
So we have a method of triggering an action in the script, but what actions do we trigger? There are multiple ways of triggering actions in an application that you don’t have API access to. One way is to disassemble the program, locate the hooks used for triggering subroutines, and inject calls to the application to run those subroutines. This is complicated and sounds like something out of ‘The Matrix’. An easier method is to use GUI automation.
GUI automation is a very fancy way of saying that we want a piece of software to pretend to be a human. It does this by generating button or keyboard presses in the same way a person would. For example, I could use GUI automation to keep my computer awake by automatically sending the space bar key to the operating system every minute. That’s not a good use case, but perhaps this gif will be more illuminating:

Much clearer. So what does this have to do with yelling “Objection!”? The answer is: Everything.
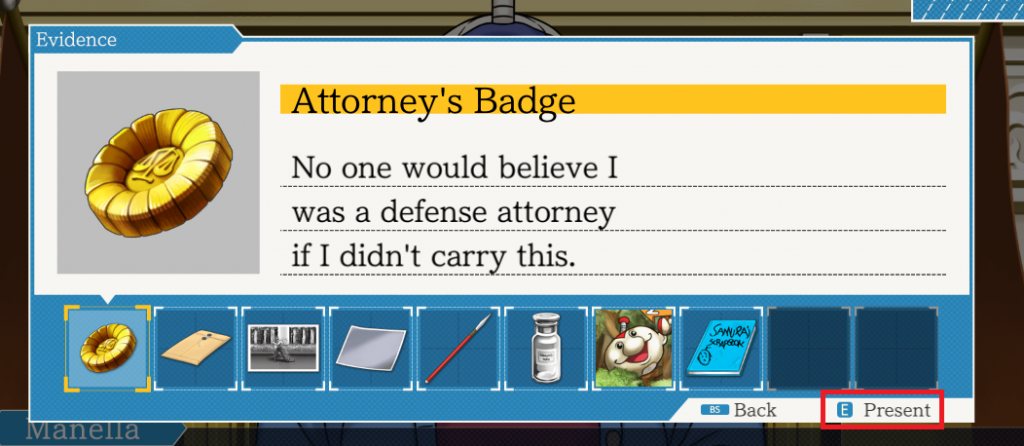
In the above screenshot, I’ve highlighted the GUI element that tells you how to object(!). You have two options: One is to click the button with your mouse. The other is to press the ‘E’ key on your keyboard. If only we had some sort of way to do either of those things through a script…

We do! We have the power of GUI automation on our side. By using the pywinauto library, we can write a couple of lines of code to send the ‘E’ key to the running game. In order to truly emulate the button press, we have to both mimic the act of pushing the key down, and then releasing the key.
def connectPhoenixWindow():
    app = pywinauto.application.Application()
    app.connect(title_re="Phoenix Wright: Ace Attorney Trilogy")
    return app

def objection():
    app.top_window().type_keys("{e down}")
    app.top_window().type_keys("{e up}")

def takethat():
    app.top_window().type_keys("{e down}")
    app.top_window().type_keys("{e up}")

def holdit():
    app.top_window().type_keys("{q down}")
    app.top_window().type_keys("{q up}")
Do those function names look familiar? Yes, those are the same functions that are called when a wake word is detected! It couldn’t be any easier. Wake word engine detects the phrase, GUI automation triggers the button press.
And..?
And what? That’s it! That’s all it takes to get voice control back into Phoenix Wright. The script itself sits quietly in the background while the game is running, detects the phrases and sends the keys to the game, mimicking the action of the player doing it themselves. If you want to see the complete code (or even download some pre-compiled binaries), take a look at the Github repository. Perhaps the simplicity of it all will inspire you to find other (more worthwhile) ways to use voice as a way to automate otherwise manual tasks. That’s all folks, hope you enjoyed!
Hermes – A Textboard
Internetless in London
Something strange happens when you’re suddenly disconnected from the Internet for a long period of time: You find other things to do. After cleaning the bathroom and tidying my room twice, beating some video games on my backlog, and somehow losing offline access to Spotify (thanks Spotify), it was time for something useful. It was time to watch a lot of Japanese drama.
I’d already watched Densha Otoko before, but I remembered it being a particularly fun romantic romp, incorporating Japanese internet culture into the plot as a major driving force. Amazingly, it’s based on a true story. Well, as true as a story from the Internet can be. The plot revolves a nerd called Yamada, who is far more comfortable in the company of his excessive collection of anime figures than around people. One fateful evening on the way back from an otaku themed event, Yamada encounters a young woman being harassed by a drunk passenger. Mustering all of his courage, he steps in and promptly gets beaten up by the drunk. Fortunately, help arrives and Yamada is saved. The young woman asks for Yamada’s address so she can send him a thank you present.
Once home, Yamada leaps on to his favourite Internet textboard, Aladdin Channel, and writes a post describing his experience and asking for advice. The plot continues with Yamada, dubbed the Train Man (Densha Otoko) by the textboard, putting Aladdin Channel’s advice into action, and attempting to win the woman’s heart.
While watching the show, I figured I could do something productive at the same time. Hermes is my first attempt at a proper, fully-featured Django application. Of course, Hermes is a textboard.
What’s a textboard?
If you’ve ever been on an Internet forum, you’re already familiar with a different version of the textboard. Textboards are piece of software that allow an administrator to create a number of boards, on which users can post threads and replies to those threads. The biggest textboard out there is 2channel (NSFW), on which the original ‘real life’ Densha Otoko story was posted. It boasts over 600 boards covering a huge range of topics, and a healthy user base.
With textboards, there are two main differences from your standard forum software:
- Users do not need to register to use a textboard. Indeed, registration likely is not an option at all. Users post either anonymously or with a nickname they provide. These nicknames are not secured in any way, meaning any user could take any nickname. Users who want their posts to be attributed to them and only them can post with a tripcode, a secret password known only to them that generates a hash that is attached to their posts.
- The content of the first post of each thread is shown on the board page, as well as the content of the latest three or four posts in that thread. This differs from most forum software, which will only show a list of thread subjects on a given board’s page. Because of the way the content of each thread’s first is shown, subjects for each thread are not mandatory on textboards.
In addition to the above, threads are pruned from the database after they see a certain amount of inactivity. Hermes, for example, is configured to delete the oldest thread if the total number exceeds fifty on a single board.
If you add images to the mix, you get an imageboard. It’s likely you might have heard more about these, such as the infamous 4chan and its Japanese counterpart 2chan (both NSFW).
Perhaps due to in part of the transient nature of posts and identity on these text- and imageboards, the culture that develops is that of a hivemind. Voices that try and rise above the others by using a name or tripcode are often berated and ignored. Of course, anonymity comes with its own problems. Unfortunately, I’m not an anthropologist, so I can’t really go more into that.
Why Hermes? And why aren’t you spelling it right?
‘Hermes’ is the name given to the female protagonist of Densha Otoko by the denizens of Aladdin Channel after Yamada receives a set of Hermès teacups from her. The Internet was down so I couldn’t Google around for cool names to give my textboard, so Hermes ended up being the name of choice. The name in the drama isn’t pronounced with the lovely accent on the e, so I elected to not use it.
Django Unplanned
My lack of Internet connection put some limitations on what I could use for this project. Sure, I could enable tethering on my phone, but to pull down entirely new software packages? That would get messy for my phone bill. Django happened to be installed on my Virtualbox after an abortive attempt at another web site, so I figured ‘hey, why not use Django?’
Reading the tutorials on my tiny S3 phone’s screen was a less than exciting experience, but with just a couple of hours work I had a super basic textboard working. Django makes CRUD applications very easy to implement. It only took a few dozen lines of code to implement the initial database structure, and the templating system for the front-end is pretty intuitive when it came to the front-end.
Heroku
The demo instance of Hermes (Hermes Channel) is deployed on Heroku, an infrastructure-as-a-service platform geared towards people like me who hear the word ‘infrastucture’ and fall asleep, only to be greeted by dark nightmares of configuration files and servers. It’s so easy to use: Once your Django app is ready and you’ve got a file describing your prerequisites you need, you can just commit to a Git branch hosted on Heroku, and they deal with the deployment automatically.
It also has the added benefit of being free: You get a free 10k row Postgres database, and 750 free hours per month to run your dynos. An Heroku dyno is basically a Linux instance that your application (or worker jobs) will run on. When you deploy an application to Heroku, it is deployed to all your dynos and started automatically. If you have just one dyno, the free allowance is enough to last the entire month! Of course, if your application has high traffic, it is likely you’ll need more than a single dyno to support it. But then again, if you have that much traffic you’re probably earning enough money to support beefing up your Heroku too, so…
The Demo!
Hermes is effectively feature-complete, so why not check out the demo? It’s mobile friendly! It’s easy to make posts too. If you’re interested in knowing how it all ticks, the source code for Hermes is available on Github.
Okay, fine, you can have a screenshot.
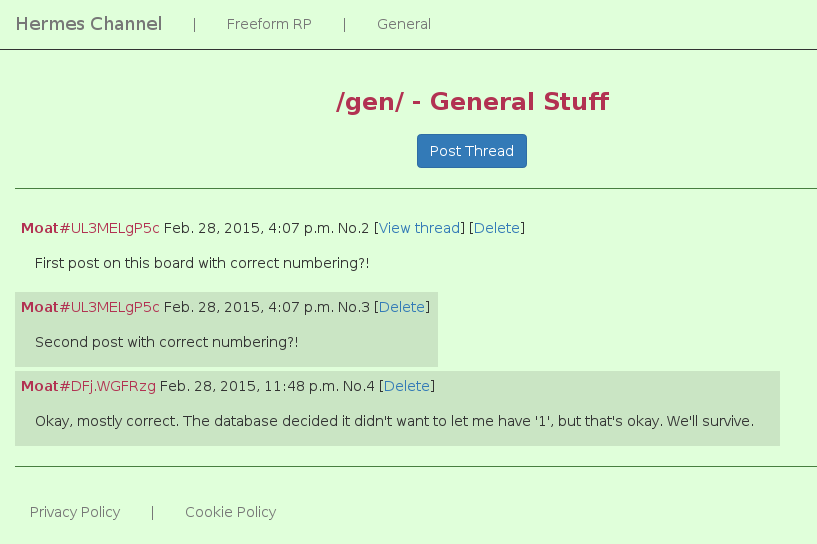
Check it out! Hermes will be released under the GPLv3. Releasing the software was always the main point of the project, the fact there’s a demo instance is just a pleasant bonus! Just follow the instructions on the Github page for installation, and you’ll be away (provided you know a bit about how Django works).
Speare2Brain
The predecessor project of Speare2Brain, Brain2Speare, took all of a day to implement. It took another day to spruce up, but the fact was: After a single day of development, nearly every Brainfuck program could be successfully transpiled to Shakespeare[1]. The same cannot said of Speare2Brain. Also, spoilers, it only partially works.
What is hell is a parser generator?
The result of the original Shakespeare project was a Shakespeare-to-C transpiler called spl2c. This is impressive in itself, and is mostly powered by GNU Bison and flex (a parser generator and lexical analyser, respectively). Flex is responsible for taking an spl file and tokenising it for consumption by a parser generated by Bison. While parsing, the program will construct C code that corresponds directly to a set of spl tokens. There’s no need for multiple passes when building the C code, because the generated C is simply a translation of the Shakespeare. For example, the command ‘Romeo: Remember thyself’ is tokenised by flex as ‘REMEMBER SECOND_PERSON_REFLEXIVE‘, which a parser generated by Bison will consume. The parser will then output code like ‘push(second_person, value(second_person))‘. The functions and constants used by the generated code comprise the remainder of the Shakespeare project: In addition to the code generated by spl2c, one must link against libspl and include spl.h when compiling to a binary.
You transpile me right round baby, right round
Of course, when I started the project I didn’t know any of this. I took a course on compilers back at university that I must have mostly sleepwalked through (although I remember doing okay?). Was there a way to take advantage of the work already done by the Shakespeare project? Of course! The hard part of lexical analysis was already done, and the parser generator would make a a great jumping off point. If I modified the parser generator, I could possibly directly output the Brainfuck instead of C! Except… Bison’s parser generation code is heavily C based. Have you ever tried working in C? I have no doubt that it would have been possible to bend Bison to my will and perform the complete transpilation as part of the parsing, but it was beyond my power and patience. If I was going to finish this project in a reasonable time-frame, I would have to work in a language I was more comfortable in.
So why not get all meta about it? I eventually decided to modify the parser generator to output something that wasn’t C. Instead, it would output a brand new language! That language came to be, and was called ‘Not-Shakespeare Programming Language’, or NSPL. By tearing out most of the good stuff from the C generation bit of spl2c and replacing it with my own horrific code, I was able to create a new program that I imaginatively named spl2nspl. This part of the project took an evening in itself to figure out and implement. Let’s compare the some of the output from spl2c and spl2nspl real quick.
| C | NSPL |
|---|---|
activate_character(30, hamlet);
assign(16, second_person, 2*2*2*2*2*2*(-1));
assign(18, second_person, int_sub(17, 2*2*2*1, value_of(18, second_person)));
char_output(18, second_person); |
activate,hamlet,
assign,const,-64,end_assign,
assign,sub,const,8,value_of,second_person,end_sub,end_assign,
output |
Yep. It’s the same thing, but written out such that it can be more easily parsed by the real workhorse of the project: A Python script named… Wait for it… nspl2bf. This is the main part of Speare2Brain that I’d like to talk about.
To be or not to be? If so, let us proceed to scene III.
Brain2Speare was a relatively simple project for many reasons. The biggest reason is as follows: It is very easy to rewrite a low-level instruction as a higher-level instruction. After all, you can translate Brainfuck symbol-for-symbol into C code, and Brain2Speare proved that it was also possible to find a similar mapping between Shakespeare and Brainfuck. What about the the reverse? That is to say, translating a higher-level language into a lower-level language. This is what real compilers and linkers do all the time: Binary files are as low-level as you can get.
Shakespeare-to-Brainfuck (or more accurately, Not-SPL to Brainfuck) was significantly more difficult to design and implement. Brain2Speare was based entirely on the idea that we could use two Shakespeare characters to represent the Brainfuck memory array. Let’s dive in to how the memory array is laid out in Speare2Brain. Once again, p is a pointer into the Brainfuck array. Shamelessly ripped from the explanation in the Github repository, and then modified for accuracy:
p[0] - Copy Register (Copy)

p[1] - Result Register (Result)

p[2] - Loop Termination Register (Loop)

p[3] - Character Value Retrieval Register (Retrieve)

p[4] - Temporary Register (Temp)

p[5] - Right Register (Right)

p[6] - On Stage 1 Register (OS1)

p[7] - On Stage 2 Register (OS2)

p[8] - Active Character Register (Active)

p[9] - Inactive Character Register (Second)

p[10] - Left Register (Left)

p[11] - First Character Register (First character's register)

p[12] - Second Character Register (Second character's register)

...
The registers are named after what they are used for the most. In reality, all the registers below p[6] are temporary and cannot be relied upon to be clean at any time. Internally, nspl2spl keeps track of the offset of each register and the ‘current’ location of the Brainfuck pointer in a class called MemoryLayout. In addition to the normal registers, we also have a number of character registers. These represent the character from the original Shakespeare, and are supposed to hold the same values and perform much of the same function as the character in the C equivalent.
I’ll go through what each register is used for, but be warned: You’ll need to know a bit about Brainfuck for this, because this is more about the hard implementation and less about the transpilation process.
Memory Registered
Time for some more shameless copying from the documentation:
- Copy – In BF, the simplest way of moving an unknown-until-runtime value from one cell to another involves looping on the source cell; decrementing the value of that cell, moving to the destination cell, incrementing that cell, then moving the pointer back to the source. In this fashion, the source cell will be emptied and the destination cell will gain the value that the source cell originally held. However, this destroys the source cell. The Copy register allows for copies between cells by not only incrementing the value of the destination cell inside the loop, but also that of the Copy register. Once the source cell is emptied, we move the value in the Copy register back into the source cell.
- Result – Multiple uses, but one notable use inside nspl2bf is as an indicator for if-else statements. We set the result register to 1 before moving the pointer to another register and attempting to enter one of two blocks, only one of which we want to execute. If we enter the first block (the ‘if’ block) successfully, we immediately decrement the Result register. After we leave the if block, we test Result and only enter the else block if it is still non-zero; that is to say, we did not enter the first block.
- Loop – In nspl2bf, it is very important that the pointer is not moved manually. You use functions in the MemoryLayout class to return movement commands, do your BF magic, then reset the pointer. However, this puts a constraint on where the pointer must be at the end of a [] block: It has to be at the same place as it would have been if the block wasn’t entered at all, otherwise we won’t know how many < commands are needed to reset the pointer. This means we have a problem if we need to terminate the loop but we know that the value in the register we used to enter the loop won’t necessarily be zero. To get around this, we use the Loop register: Move the value of the ‘entering’ register into Loop, move the pointer to said ‘entering’ register, allow the loop to terminate, and then move Loop back into the original register.
- Retrieve – This is horrible to explain. In
nspl2splwe store the offsets of character memory cells in other registers named Active and Second. Retrieve is used to hold these offsets when forcing the memory pointer to the character’s cell via some really twisted construction. It’s only named Retrieve because it was created out of necessity while writing theassigntranspilation code. It serves as any other temporary register otherwise. - Temp – It does whatever it needs to do. It’s not the register we deserve, but it’s the one we need.
- Right – Holds the value for the right and unary argument in binary and unary expressions respectively.
- On Stage (OS1, OS2) – The On Stage registers contain the memory offsets of the characters currently on stage. They’re necessary because when we ‘activate’ an On Stage character, we need to put the inactive character into the Second register. To do this, we need to know which characters are on stage, hence the OS registers.
- Active – This holds the offset of the active on stage character. More on this below.
- Second – Holds the offset of the character that is on stage but NOT active. This is very useful, because many commands like assign operate exclusively on the inactive character. Having their offset stored simplifies things, but actually accessing the value at the offset is something of a pain. However, because we can construct some really twisted Brainfuck to let as get that memory pointer in the right place.
- Left – Holds the value for the left argument in binary expressions. It occupies this part of memory because it is secretly the first character, which means it gets its own stack. This is required because
nspl2bfevaluates binary expression trees from left-to-right, meaning the value in the left register can get clobbered when calculating the right value. To avoid this,Lefthas its own pseudo-stack for storing evaluated expressions. - Character registers + stacks – These hold the value that each character currently, well, holds. Each character has a stack counter cell
ncells after their initial offset, wherenis the number of characters in the original Shakespeare. The next cellnspaces after marks the bottom of the character’s stack, and everynth space after that is another possible value of their stack.
Do you bite your thumb at me, sir?
A couple of high level examples for what the transpiler does: Each token read by nspl2bf from an nspl file generates Brainfuck code for manipulating the above registers. For instance, the activate token will cause the parser to grab the next token (the name of a character), then output the Brainfuck for copying that character’s offset into the Active register. Under the assumption that this character is already on stage, the other character who is on stage will have their offset copied into the Second register. Why? Because that’s what the original C would have done: If a character is activated, the other character on stage is inactive. Certain other tokens use the active or inactive character for their functions, so it’s important that we know which characters are both on stage and active.
The assign token (a true monster to implement) first clears the Result register before parsing all the tokens between itself and end_assign. The tokens between these two are expression tokens that represent one of the following: Constant values, unary functions, and binary functions. After each of these are applied, we expect a value to be stored in the Result register that is then copied into the memory offset pointed to by the Second register.
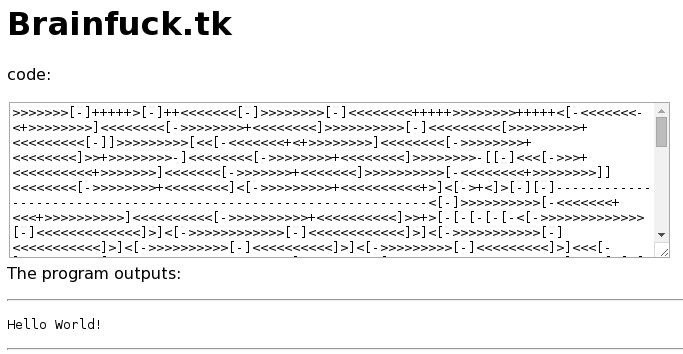
At a high level, it’s quite easy to describe what each function does. However, writing the Brainfuck to actually do all that? It’s horrible. It’s really, really hard (not for a good programmer, but yeah). Especially for things like the GOTO statements and the character stacks that we loved so much in Brain2Speare. In fact, those are so hard, they’re not even implemented. That’s right, Speare2Brain isn’t finished. However, it has passed a major development milestone: It successfully transpiles the Hello World Shakespeare program into Brainfuck. Even better, the Brainfuck itself actually runs and prints ‘Hello World!’. There’s one tiny little caveat, but I don’t really care:
azrael@Phoenix> wc -l examples/hello.spl
89 examples/hello.spl
azrael@Phoenix> wc -m examples/hello.bf
22739 examples/hello.bf
Yeah, the end result is huge, but we’re not writing gcc here. But nevertheless:
Oh baby.
Speare2Brain deserves way more explanation, especially more details on the transpilation itself. I’ll write more about it in a follow-up post: We’ll dive into the real crunch that is the mapping between nspl and Brainfuck. In the meantime, check out the Github repository for the project! If you want to see a bunch of example nspl, just clone the repository and run make. It should generate all the example nspl files along with some non-functioning Brainfuck for every file except hello.spl.
Footnotes
[1] An exception until recently included programs that relied on a wrapping cell implementation of Brainfuck. Until I wrote Speare2Brain, I didn’t even realise such implementations existed, but they end up making many, many otherwise difficult tasks much simpler.
Brain2Speare
Intro
This post is about a Brainfuck-to-Shakespeare transpiler that I wrote one warm Sunday evening called Brain2Speare. To fully appreciate this post, you will need to know a bit about the Brainfuck and Shakespeare esoteric programming languages, but don’t worry! I’ll talk a little bit about each of those before diving into the meaty bits.
First, what’s a transpiler? It’s like a compiler, except it doesn’t compile to an executable file. Instead, source code written in one programming language run through a transpiler will be ‘transpiled’ to source code in another language. The produced code is theoretically equivalent to the original code: If both programs are compiled with their respective compilers, we expect that running them will produce the same outputs given the same inputs. It’s not a new concept. According to Wikipedia (the most trustworthy source available), many implementations of programming languages we use today started life as transpilers. C++ originally transpiled to C, Coffeescript still transpiles to Javascript… And now most importantly of all, Brainfuck transpiles to Shakespeare. Even though Brainfuck can be run directly via countless interpreters or compilers, I thought it would be a fun project to write a transpiler from one joke language to another. I was right!
And how about an esoteric programming language? The clue is in the name: They’re programming languages that are esoteric. Unusual and typically designed as a joke, esoteric programming languages thrive on weird or minimal syntax, confusing behaviour, and general unwieldy-ness. For example, one might look to Malbolge as the quintessential ‘screw you’ language. I won’t even attempt to explain it, check out the link if you want to see what true malice looks like.
Brainfuck
Let’s dive in with a brief explanation of Brainfuck. One of the oldest esoteric programming languages, Brainfuck was designed by Urban Müller in 1993. He’s quite into sky-diving.

It consists of eight instructions, an infinite-length tape, and hatred. Doing anything useful in this language isn’t recommended, but not impossible. To give you an idea about how difficult working in Brainfuck is, imagine a C program with a single char* pointer called p pointing to the beginning of an infinite char buffer. Now, each of the eight instructions can be represented by C code.
| Instruction | C equivalent |
|---|---|
> |
++p; |
< |
--p; |
+ |
++*p; |
- |
--*p; |
. |
putchar(p); |
, |
*p=getchar(); |
[ |
while(*p) { |
] |
} |
You could almost transpile Brainfuck to C immediately by applying the above transformations to a Brainfuck program. Here’s what Hello World looks like in Brainfuck:
++++++++[>++++[>++>+++>+++>+<<<<-]>+>+>->>+[<]<-]>>.>---.+++++++..+++.>>.<-.<.+++.------.--------.>>+.>++.
Looks kind of compact, right? Until you apply those above transformations and discover the horrific C program lurking beneath the surface:
++p;+p;++p;++p;++p;while(*p) {++p;++p;++p;++p;++p;while(*p) {++p;++p;++p;++p;++p;++p;++p;++p;++p;++p;++p;++p;++p;--p;--p;--p;--p;--*p;}++p;++p;++p;++p;++p;--*p;++p;++p;++p;while(*p) {--p;}--p;--*p;}++p;++p;putchar(p);++p;--*p;--*p;--*p;putchar(p);++p;++p;++p;++p;++p;++p;++p;putchar(p);putchar(p);++p;++p;++p;putchar(p);++p;++p;putchar(p);--p;--*p;putchar(p);--p;putchar(p);++p;++p;++p;putchar(p);--*p;--*p;--*p;--*p;--*p;--*p;putchar(p);--*p;--*p;--*p;--*p;--*p;--*p;--*p;--*p;putchar(p);++p;++p;++p;putchar(p);++p;++p;++p;putchar(p);c
Yikes. That’s your crash course in Brainfuck. Check out the link at the top of this post for more info.
Shakespeare
Shakespeare was written by this guy:

Just kidding! Shakespeare was designed by Kalle Hasselström and Jon Åslund, and it’s quite incredible. Rather than tell you the instruction set (we’ll go into it in more detail when talking about Brain2Speare anyway), here’s a snippet from the Hello World program:
The Infamous Hello World Program.

Romeo, a young man with a remarkable patience.
Juliet, a likewise young woman of remarkable grace.
Ophelia, a remarkable woman much in dispute with Hamlet.
Hamlet, the flatterer of Andersen Insulting A/S.


                    Act I: Hamlet's insults and flattery.

                    Scene I: The insulting of Romeo.

[Enter Hamlet and Romeo]

Hamlet:
 You lying stupid fatherless big smelly half-witted coward!
 You are as stupid as the difference between a handsome rich brave
 hero and thyself! Speak your mind!

 You are as brave as the sum of your fat little stuffed misused dusty
 old rotten codpiece and a beautiful fair warm peaceful sunny summer's
 day. You are as healthy as the difference between the sum of the
 sweetest reddest rose and my father and yourself! Speak your mind!

 You are as cowardly as the sum of yourself and the difference
 between a big mighty proud kingdom and a horse. Speak your mind.

 Speak your mind!

[Exit Romeo]
You’d never believe that was code, right? It definitely has the trappings of describing a program: The repeated references to differences and sums, ‘speak your mind’ probably meaning ‘print your value’… Well, there’s a transpiler for the above that will convert Shakespeare to C code. Said C code will compile with the help of the libspl (lib-Shakespeare Language) library. Crazy huh? The transpiler was written with the help of GNU Bison and flex, parser and lexical analyser generators.
Characters in Shakespeare represent memory addresses, and through the medium of dialogue their values are manipulated. All characters in Shakespeare programs MUST be from a Shakespeare play, the transpiler will not accept any non-Shakespeare characters. Turns out roses aren’t as sweet if called by any other name.
In the above, Hamlet tells Romeo that he is as brave as the sum of his fat little stuffed misused dusty old rotten codpiece and a beautiful fair warm peaceful sunny summer’s day. This transpiles to a C statement that assigns the value of -96 to Romeo. Wait, what? How does that make sense? In Shakespeare, we have the notion of ‘positive’ and ‘negative’ adjectives, nouns, comparatives, etc. A noun is worth either 1 or -1 if it is positive or negative respectively. A codpiece is a negative noun, and as such has value -1. Each adjective has the effect of doubling the value of a noun. In the case of the codpiece, it has seven such adjectives in front of it. 2^7 is 128, but the value is negative so we get -128. We apply a similar process to the positive noun ‘summer’s day’ and find that we’re actually calculating the sum of -128 and 32 and assigning the result to Romeo. Phew. The rest of the program continues in a similar fashion, where occasionally Romeo is asked to print the ASCII character corresponding to his stored value (“Speak your mind!”). I recommend checking out the Shakespeare homepage for more information, but be warned if you want to download the transpiler and run it for yourself: The official parser has a bug when reading Roman numerals. It has been fixed in an unofficial build, which I recommend using instead.
Brain2Speare
Now for the main event! I have written an abomination. Brain2Speare takes a Brainfuck program as input and outputs a Shakespeare program. The methods by which it performs this vile transformation are witchcraft. A simple Python program written in an afternoon, Brain2Speare abuses a feature of Shakespeare in order to simulate the never-ending buffer that a Brainfuck program operates on. But before I talk about that, let’s talk about the initial failed attempt.
At first, I naively believed that by using the full cast of every Shakespeare play that we would have enough memory spaces to run virtually any Brainfuck program. Using the Brainfuck-as-C translation as an example, Romeo in the transpiled code could represent p[0], Juilet could represent p[1], and so on up until p[120] or thereabouts. Turns out, this is garbage for a couple of reasons. One: Only using 120 spaces on the tape? Never gonna happen except for the most basic Brainfuck programs. Two: I thought I’d be able to tell which characters were ‘on stage’ by reasoning about the supposed location of the data pointer at each point in the source program. This would have been fine, if it weren’t for a little thing called a ‘while loop’. For instance, suppose I’ve decided that Romeo, Juliet, Hamlet, and Lady Macbeth are to represent p[0], p[1], p[2], and p[3]. If a Brainfuck program starts at p[0], then the program >>> can be reasoned about at each instruction to say that before the code is run, Romeo should be on stage, after the first instruction is run, Juliet should be on stage, after the third instruction Hamlet should be on stage, and so on. However, for a program like this: >[>-] We’re immediately in trouble if we don’t know what the values stored in the buffer are after the second instruction, because we don’t know how many times the loop will run. We’d have to effectively run the program in order to know who should be on stage… And if we’re going to do that, we might as well go the whole hog and just write a program that prints the eventual output without performing any of the computations that the source program does. Lame.
So for an hour or so, I was stumped. If we didn’t know who was on stage at each point in the program, or who had to have their values modified, we wouldn’t be able to write a Shakespeare file. After poring over the Shakespeare documentation for some time, some hope emerged. Each character, in addition to storing a single value, has a stack associated with it. A stack! That means we can store ‘infinite’ values in a single character, thereby removing our initial problem of only having about a hundred characters to choose from. It also solved the problem of knowing which characters had to be on stage, because now we would only need two characters to represent the entire memory space used in a Brainfuck program. A quick explanation of how the stack works in Shakespeare: As mentioned before, a character holds a value and also a stack. If the other character on stage instructs the character to ‘Remember X’, where X is an expression such as a sum or value, X is pushed onto the top of that character’s stack. If the character is asked to ‘recall’, the character’s held value is replaced with the value on the top of the stack, and the stack is popped.
Using stacks and a bit of thinking, I was able to construct a mapping between each Brainfuck instruction and a set of Shakespeare instructions. Going back to the infinite buffer that forms the Brainfuck data array, I would have one character hold all values up to the current location of the pointer in his stack, while a second character would use her stack to hold all the values in the buffer after the current position of the pointer. A picture would be helpful:
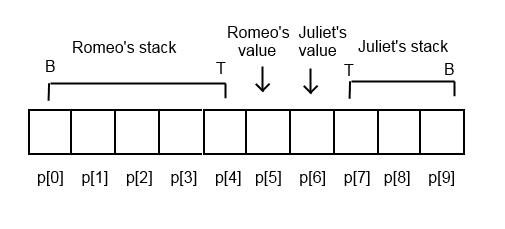
Now we can do some work! If we are given the instruction > (as a reminder, this will move the pointer forward by one), we will have Romeo push his current value onto his stack, have Romeo take Juliet’s value, and then have Juliet pop her stack.
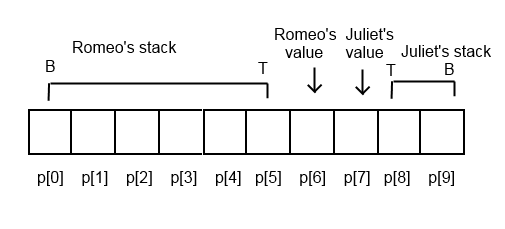
> instruction
At this point, it is probably clear that Romeo represents our p pointer, now pointing to p[6] after the > instruction. < works similarly, but in reverse. In Shakespeare, the > command transpiles to:
Juliet: Remember yourself!
Romeo: Recall your past mistakes.
Juliet: Thou art as vile as me.
Note that the above code is slightly different from what I described: In the actual program, Juliet’s held value doesn’t matter. We only care about what’s on her stack. This code should work just as well by swapping the second and third statements and making adjustments elsewhere in the transpiler, and the generated code would match our above description.
The + and - instructions are simple too. As you may have noticed, whenever you add or subtract in Shakespeare you have to do it in a power of two. To make a non-power of two number, you have to sum up several powers of two. That’s right, you’re effectively setting bits with each Shakespeare instruction, and that’s the only way to store an arbitrary value in a character. My transpiler is clever: Given code like +++++++ (add 7 to *p), it will not generate the following:
Juliet: You are as brave as the sum of a fox and yourself! You are as handsome as the sum of a warm summer's day and thyself. You are as good as the sum of a handsome rich brave hero and yourself!
That’s three instructions that add one, two, and four to Romeo’s value. Instead, by counting the number of bits in the difference between the next highest power of two (eight) and the value you want to add (seven), it becomes clear that it would be fewer instructions to add eight to Romeo’s value and subtract one:
Juliet: You are as brave as the sum of a cunning clever brave rich fox and yourself! You are as dull as the sum of a codpiece and thyself.
Same result, less code generated!
The . and , instructions are easy too, transpiled into their direct Shakespeare equivalents.
Juliet: Speak your mind!
Juliet: Open your mind.
The remaining challenges are the [ and ] instructions. They form the only control path-affecting instructions in Brainfuck, and represent while loops in C. Shakespeare has two ways to control program flow, and they’re often spotted together:
Lady Macbeth: Are you as rich as me?
Romeo: If so, let us proceed to scene III.
The first statement is clearly a comparison, and the following ‘if so’ statement forms the conditional to go along with it. In this case, if the condition is true we will jump to scene III. This is a GOTO, but don’t worry, it won’t bite. Lady Macbeth has made her first appearance in our transpiler: Her only role is to have a value of zero and to be compared against Romeo whenever we encounter a [ or ]. If she is equal to Romeo at the [ instruction, we skip to the corresponding ], else we keep running the program as normal. If she is not equal to Romeo at a ], we do the jump back to the [. In order to translate this into Shakespeare, we do a pass on the Brainfuck code to pull out all the parentheses and pair them up. We assign each of them a scene number that we will use when we generate the code associated with each pair.
The code generated for a [ looks like:
  Scene III: A love lost.
  [Exeunt]
  [Enter Lady Macbeth and Romeo]
  Lady Macbeth: Are thou as handsome as me?
  Romeo: If so, let us proceed to scene IV.
  [Exit Lady Macbeth]
  [Enter Juliet]
First we plop down a GOTO marker in the form of the scene statement. Then we clear the stage and bring on Lady Macbeth and Romeo. Lady Macbeth states her question and then the GOTO is either performed or ignored. If not, Lady Macbeth will leave the stage and Juliet will return.
For ], we have a similar block:
  [Exit Juliet]
  [Enter Lady Macbeth]
  Lady Macbeth: Are thou as ugly as me?
  Romeo: If not, let us proceed to scene III.
  [Exeunt]
  Scene IV: Big Trouble in Little Denmark.
  [Exeunt]
  Enter Romeo and Juliet]
Once again, we get rid of Juliet and perform our comparison. This time we make sure Romeo is not equal to zero. If we don’t do the jump, we restore the Romeo-Juliet stage and continue with the program. We’ve also put down the scene marker for the [ instruction to jump to if that comparison passes.
Hang on, is that it? That’s every instruction covered! That’s just about the whole process in transpiling Brainfuck to Shakespeare. There’s some boilerplate stuff you need to do as well: A full Shakespeare program needs a Title and a Dramatis Personæ listing the characters you’ll be using. There’s also a higher-level jump marker called an ‘Act’, of which scenes are a part of. And in Brain2Speare, there’s a total of three passes done on the code: One pass on the Brainfuck code to grab the parentheses and pair them up correctly, another pass on the Brainfuck code to generate the initial, very boring Shakespeare file, and a single pass on the generated Shakespeare to make it more entertaining and spruce up the text a little.
To finish off, here’s what the whole thing looks like in action. brain2speare.py is our transpiler, hello_world.b contains our Brainfuck program, test.spl is our generated Shakespeare file, spl2c is the Shakespeare-to-C transpiler, and test is our final executable. I hope you enjoyed this, and remember to check out Brain2Speare on Github!
 azrael@Phoenix>cat examples/hello_world.b
++++++++[>++++[>++>+++>+++>+<<<<-]>+>+>->>+[<]<-]>>.>---.+++++++..+++.>>.<-.<.+++.------.--------.>>+.>++.
azrael@Phoenix> ./brain2speare.py examples/hello_world.b > test.spl
azrael@Phoenix> cat test.spl
The Interpreted Brainfuck.

Hector, a stack that represents the present and past.
Mistress Ford, a stack that represents the future.
Cassandra, a zero that is only good for comparison.

Act I: An egregious abuse.
Scene I: The stackening of Mistress Ford.
[Enter Hector and Mistress Ford]

Hector: Remember thyself! [Many, many, many times to build the stack, snip]

Act II: Our main performance.

Scene I: It begins here.

[Enter Hector and Mistress Ford]

Mistress Ford: Thou are as amazing as the sum of yourself and a cunning trustworthy bold pony!

Scene VI: A cowardly plum.

[Exeunt]

[Enter Cassandra and Hector]

Cassandra: Are you as fine as me?
Hector: If so, let us proceed to scene VII!

[Exit Cassandra]

[Enter Mistress Ford]

Mistress Ford: Remember thyself!
Hector: Recall the prompt Hell in the mind's eye.
Mistress Ford: Thou are as proud as me. You are as rich as the sum of yourself and a prompt golden hero.

Scene II: An embroidered joy.

[Exeunt]

[Enter Cassandra and Hector]

Cassandra: Are thou as noble as me?
Hector: If so, let us proceed to scene III.
[It continues ...]
azrael@Phoenix> ./spl2c < test.spl > test.c
azrael@Phoenix> gcc test.c -I . -L . -lspl -lm -o test
azrael@Phoenix> ./test
Hello World!
Oh baby.
Curses! – A Post That Ends Up Being About Capturing Ncurses Output And Converting It To HTML
So I had an idea the other day! I started to implement it, but it turned out it was already done way better elsewhere, so I dropped it. But let’s talk about it anyway, because it’s not the worst idea ever and I had a fun experience as a result.
For some reason, I was under the impression that a really good web-based Interactive Fiction interpreter wasn’t available. I have no idea why I held this idea, because I had been using Parchment to play Z-Machine games online for the past couple of days. Maybe I figured there wasn’t a good online Glulx interpreter, but I was wrong about that too. In any case, the idea was simple: Provide a reasonable method of playing Interactive Fiction online with near-perfect emulation of how it would feel when played on a native interpreter.
The method I chose was chosen because I am lazy. It was literally to be a bunch of different things I found online all cobbled together. The fundamental plan was to run a Linux Z-Machine interpreter for each user, take ‘screenshots’ of the terminal, convert this screenshot to HTML and serve it to the user via a web interface. Input would be sent down to the interpreter from the browser, ‘screenshots’ get sent back up. This would have meant the user experienced ‘lag’ when typing, but I was just pleased that I thought I struck upon a novel method of delivering an authentic native Z-Machine experience in the browser.
Rather than talk about why that was all a terrible, terrible idea, let’s focus on the journey and not the aborted destination. While the idea didn’t pan out, I did learn a thing or two about the terminal and ANSI codes. In fact, I even found and fixed a bug in tmux! The fix hasn’t been accepted as a patch yet, and it might not be because it’s not the cleanest solution to the problem… But I did discover a bug, so yay!
So how did I end up doing that? Well, it turns out that the very first step of the journey was a doozy. Capturing output from the terminal is not usually very difficult. I was using a Z-Machine interpreter called Frotz to do the heavy-lifting of running the IF games. Naturally, my first attempt was redirecting the output of Frotz to a file and finding a tool to convert the ANSI to something more web-friendly. That’s when I came across ansi2html.sh, which didn’t work at the time for a very particular reason. Frotz uses something called ncurses to draw its screen. Rather than scroll the terminal when new text has to be printed, it prints over the existing space by using special terminal control codes called cursor movement instructions. These instructions are used by ‘printing’ them to the output. When one of these characters is ‘printed’ by the terminal, the cursor is moved according to the instruction rather than a new character being printed. After being moved, new text is drawn over the text that was previously present in that spot.
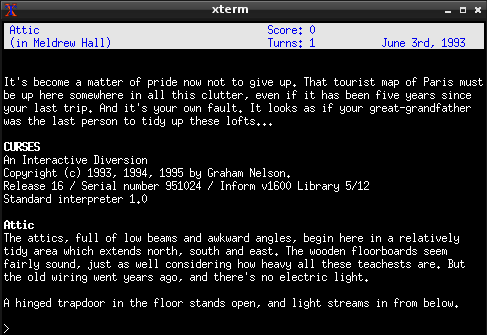
This means that Frotz doesn’t output lines delimited by newline characters. Instead, it prints out one very long line that uses these cursor instructions to move the cursor around and redraw over already printed characters. This confuses ansi2html, which tries very hard but eventually can’t keep up with the complicated sequence of cursor movements. This explanation doesn’t do the process justice, so here’s a few pictures. First up, here’s a picture of what Frotz looks like when it’s running (or if the output file is printed using ‘cat’):
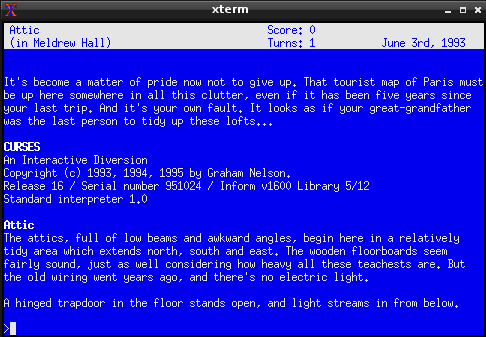
That looks pretty standard, right? Here’s what the underlying ANSI looks like:
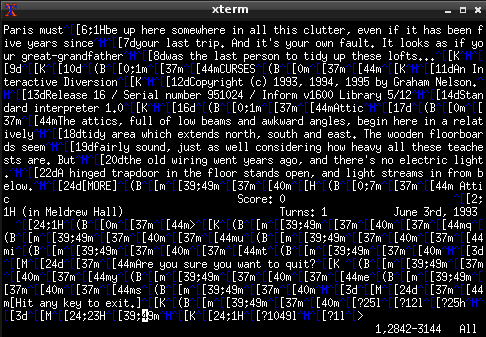
Wow. Interestingly, you can ‘cat’ this file and the output looks exactly the same as the first screenshot (Technically speaking. You would have to strip out a screen-clear instruction first). So ‘cat’ can handle it, but ansi2html.sh produces this:
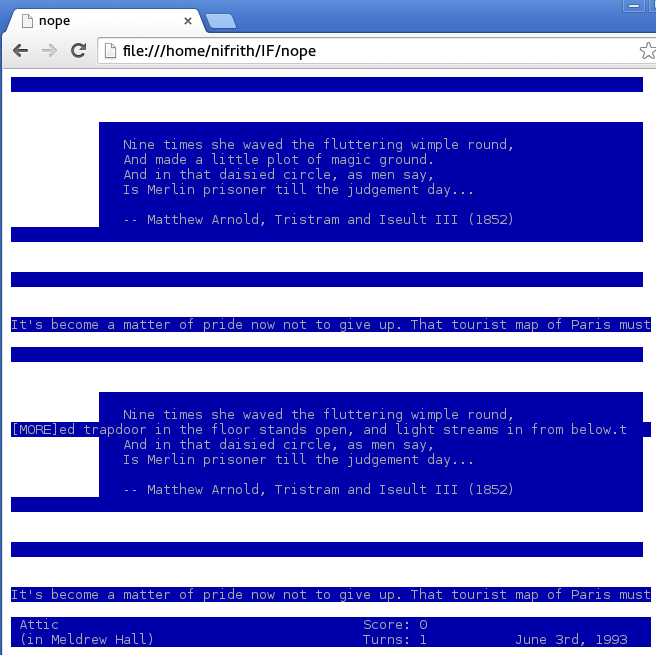
It’s a good effort, but it’s clear that ansi2html can’t do this. Other tools purported to be able to convert ncurses ANSI output to something more usable, but I tried them to no avail. I needed some sort of pre-processing step: To convert this mess of ANSI characters into a more easily manageable mess of ANSI characters. Enter tmux.
Tmux is a terminal multiplexer, just like ‘screen’. It has one advantage over ‘screen’ that I was interested in: It can capture coloured ‘screenshots’ of the terminal and write them to a hardcopy. A hardcopy is basically just a screen capture, like the output file from earlier but stripped of cursor control characters and the like. Tmux generates this by examining each individual character in its viewing pane and deducing which ANSI flags would have to be set to produce that character. In effect, tmux produces a perfect facsimile of terminal output, minus any crazy terminal control characters. Generating the hardcopy isn’t hard. I opened a terminal and booted up tmux. Once within tmux (which again, functions very similarly to ‘screen’), I started Frotz and used another terminal to send the commands to the tmux process, causing it to capture its current viewing pane to a buffer and then saving that buffer to a file called tmux.hardcopy:
tmux capture-pane -eJ ; tmux save-buffer tmux.hardcopy
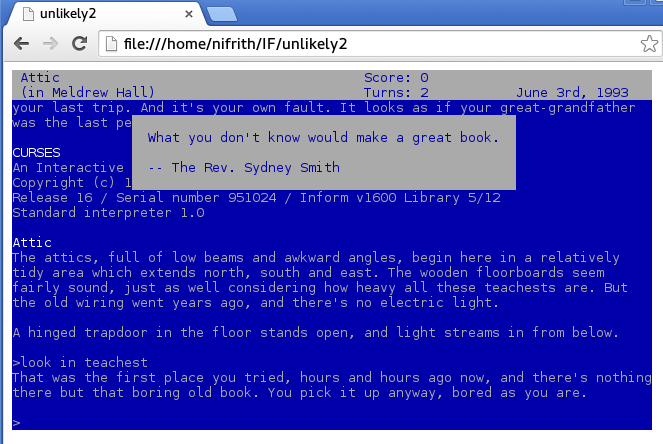
So did it work? We should be able to ‘cat’ the hardcopy and get back the same image as the first one.
Okay, but where did the colour go?! I can see it in the header, but it suddenly disappears. Well, ignoring that, how does ansi2html perform with the hardcopy?
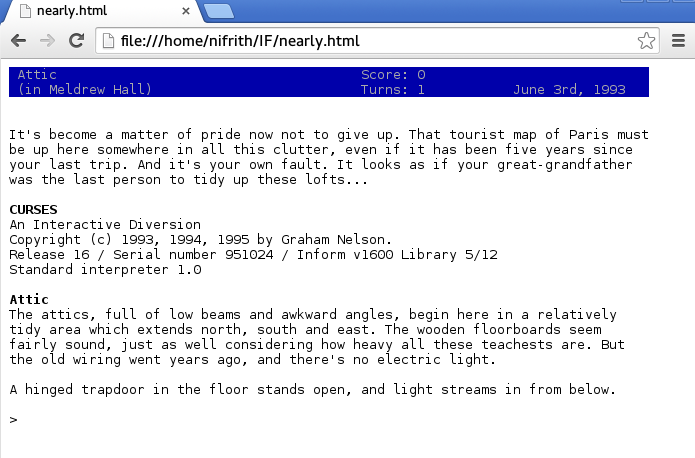
That’s so much better! But the colour is still missing. What gives? Well, it turns out that tmux has a bug which incorrectly sets certain flags. If certain attributes change between characters (in this case, the ‘reverse colours’ attribute), a special character is printed which resets all attributes. The remaining attributes are then re-added via their own special character instructions. However, the colour instructions are not refreshed like the other attributes, so suddenly we’re missing all the colour from the output from that point on because tmux believes it only has to print the colour changing code once at the start of the hardcopy, rather than after every attribute reset. So I wrote a patch for tmux! It’s one of my first experiences with contributing to open source.
As I was writing this, one of the tmux maintainers got back to me regarding my patch: It’s good, but it’s not quite there. It has its own problems, but we’re working through it to get a proper fix together. Hopefully no one will ever actually need the patch above!
Anyway, shortly after finding/fixing the tmux bug, I realised the project as it was envisaged was fairly pointless. However, I did get to find a real-life bug in something open source! And I got a blog post out of the whole experience too. And of course, this little post wouldn’t be complete without a final screenshot of ansi2html finally taking on an ncurses program and winning:
Strictly speaking, I had to modify ansi2html to get the reverse colours working correctly. You can find my modified version at this gist here. But yeah! There you go: How to capture output from programs that use the ncurses library and convert them to html! Looks like something good came out of the journey after all. Maybe I’ll talk about how I tracked down the tmux bug next time?
Interactive Fiction
>look
Castle Darbenghast
You stand in a massive courtyard, surrounded on all sides by stone walls that seem to touch the sky. In front of you, there is a marble pedestal carved with ornate shapes of pugs.
There is a book on the pedestal.
>take book
Taken.
>read book
The book is a collection of something called 'blog posts'. You turn to the latest one and begin to read..
Interactive Fiction is a bit like a book that you control, in the same way that your average AAA blockbuster from Ubisoft or EA is a movie that you take the lead role in. The primary difference, naturally, is the medium. Far Cry or Halo may be worth 60,000 words per second according to the old adage, but with a piece of interactive fiction the pictures you paint are your own. Interactive Fiction (or IF) games are also known as text adventures. What follows is a ton of waffle: If you get bored, just skip to the end of the post. I have some links that you must click.
In a piece of interactive fiction the reader is given a chunk of text. After reading the text, the player must now react to it. By providing an action to the game, such as ‘look’ or ‘punch mugger’, the game decides the outcome of the action and prints another block of text to respond to. This event-response interaction continues until the story reaches an ending, whether that be a happy one (becoming king of the land), or one that’s slightly less optimal (becoming the court jester).
While the parsing and variety of actions in these games are impressive, they are limited by the imagination of the game’s author. Pretty much everything you type will be of the form ‘verb noun’, with a smallish number of verbs. Don’t be tricked into believing you’re writing a story with the computer: You’re an actor in someone else’s world, and they’ve already decided how the story should end.
In this regard, I would compare Interactive Fiction to a computerised version of a highly railroaded Dungeons and Dragons game. The dungeon master already knows how you the players will advance, and it’s up to the group to stay on the track defined by the dungeon master or face the consequences.. Or even simply be flat-out told they can’t perform certain actions for fear of derailing the story. However, much like a well-run railroad, a great piece of interactive fiction won’t ever leave you wondering how to move forward, or trying to get into the head of the creator to attempt to divine the next move. Instead, you feel like a person in a living breathing world, doing what would come naturally. Even if you can’t break the flow of the game, with some good direction and writing you’ll actually want to stay in the flow.
Another example may be in order. Below, I’ve played through a tiny amount of the legendary IF known as ‘Zork‘. My inputs are prefaced with a >, the rest of the text is provided by the game.
Copyright (c) 1981, 1982, 1983 Infocom, Inc. All rights reserved.

ZORK is a registered trademark of Infocom, Inc.

Revision 88 / Serial number 840726
West of House
You are standing in an open field west of a white house, with a boarded front
door.
There is a small mailbox here.
>open mailbox
Opening the small mailbox reveals a leaflet.
>get leaflet
Taken.
>read leaflet
"WELCOME TO ZORK!
ZORK is a game of adventure, danger, and low cunning. In it you will explore
some of the most amazing territory ever seen by mortals. No computer should be
without one!"
>go southeast
South of House
You are facing the south side of a white house. There is no door here, and all
the windows are boarded.
>go northeast
Behind House
You are behind the white house. A path leads into the forest to the east. In
one corner of the house there is a small window which is slightly ajar.
>open window
With great effort, you open the window far enough to allow entry.
>enter house
Kitchen
You are in the kitchen of the white house. A table seems to have been used
recently for the preparation of food. A passage leads to the west and a dark
staircase can be seen leading upward. A dark chimney leads down and to the east
is a small window which is open.
On the table is an elongated brown sack, smelling of hot peppers.
A bottle is sitting on the table.
The glass bottle contains:
A quantity of water
>
And so on. The example has hopefully made the idea behind IF clear: Interactive Fiction is a story that you have a degree of control over. In particular, you control which paragraph gets printed when. You do this by navigating and interacting with a world described entirely by text (in the majority of games. Some feature graphics, but those are far and few between).
Why is this so amazing? Well, truth be told, in this age of AAA blockbusters and superb indie studios, maybe text adventures are a bit archaic. However, interactive fiction still has its merits. For one thing, it’s still fun, just like how reading hasn’t aged a day since the press was invented. For another, people are still writing text adventures! You might have noticed in the example above that Zork was first published in 1981. People are still making these games, over twenty years on. They’re still wonderful, ageless experiences. From a new reader’s perspective, there is a vast library of IF out there and, because of the near universality of how they’re played, once you’ve played one you’ll know how to play them all. For potential story-tellers, IF is a very interesting medium to work with. Outside of the classic Choose-Your-Own-Adventure books, there are very few text-based ways for authors to provide an interactive experience for their readers. What better way than to let them discover with their own actions the world you’ve crafted?
Basically, if you like books and you like pretending you’re a character in a book, you’re going to get along fine with Interactive Fiction.
Before I set you loose on some of my favourite introductory examples of the genre, let me give you a quick primer on a few common text adventure commands:
>go <direction>– There is seldom a more often used command than thegocommand. Given a direction, this moves the player from one location to another in the game’s world. So common is this command, most parsers allow the user to drop the wordgoentirely, understand implicitly that a command like>northmeans>go north. The directions themselves can be shortened: North becomes ‘n’, south becomes ‘s’, etc. The classic directions in IF are the compass cardinals and intermediates, along with ‘up’ and ‘down’. Sometimes games will prefer you use terms like ‘enter’ or ‘move’.>inventory– This command lists the players inventory. Most parsers will understand ‘i’ to be shorthand for ‘inventory’. Example output:
>i

You are carrying:

  A leaflet
>get <noun>– This command moves an item from the world into the player’s inventory. There is the opposite command as well:drop. Example output:
>get knife

Taken.>look– This command displays the description of the current area the player is in. Usually, you are shown this description upon entering a room via ‘go’, but you might want to see it again to check if anything has changed (new items, a slightly different description of that brick wall..). Most parsers will understand ‘l’ to be shorthand for ‘look’. If you provide a noun to the command, you can examine an item in your inventory or in the room more closely. Example output:
>l

Attic

This is the attic. The only exit is a stairway leading down.

A large coil of rope is lying in the corner.

On a table is a nasty-looking knife.
These are just a selection of the seriously huge number of potential commands. More avant-garde games may not even implement some of these standard commands, or others simply might have no use for things like an inventory. If you’re wondering how to perform a certain action, try typing it to see if it works. For instance, if you have a closed jar and you want it to be open, try typing >open jar! You might be pleasantly surprised. If the author is doing a good job, most of the items you come across will have obvious uses, or contain a hint as to the proper verb in its description. Parsers also give you hints if you seem to mean one thing but have typed another; for instance, if you type unlock door, the parser is likely to prompt you: With what?. That’s your cue to say door key or some such. One last thing about commands: You can usually type ‘save’ and ‘load’ to.. Well, you can probably figure that one out.
Okay, it’s time. You’re in for a treat. To play interactive fiction and most text adventures, you’ll need an interpreter and game files. The interpreter will run the game files, which are typically in .z5 or .z8 (known as Inform) format. There’s also the option of playing games line using online interpreters. I’ll close out this article with links to WinFrotz, a Windows Inform Interpreter, the IF Database, where you can find many, MANY games, and links to some great introductory or otherwise noteworthy IF games:
- Zork – Where would we be without Zork? Explore the dungeon, get treasures, solve puzzles. Very pure, and very hard. This game is many people’s first experience with IF, but I’d say it’s probably too unforgiving. If you’re a glutton for punishment, go for it!
- Photopia – A story by a modern Interactive Fiction master named Adam Cadre, Photopia is a perfect introduction to Interactive Fiction. Don’t read the reviews. Either play it online, or if you want the real experience, grab a Glulx interpreter and the game file proper and play it like that. Just don’t read the reviews, okay? If I remember right, the DOS version also works a treat.
- Spider and Web – You’re a tourist in a big city, and have somehow ended up in an empty back-alley. How strange. Safely playable online, and fairly forgiving in terms of mechanics and difficulty. Not 100% introductory, but definitely a shining example of a well-written piece of fiction.
- 9:05 – Another game by Adam Cadre. You wake up at 9:05. Time for another day. Very, very short game. I’d say it’s a brilliant introduction to IF. Play online, be amazed.
- Ad Verbum – Something a little more unconventional. If you’re a fan of puns and wordplay, this is a delight. The parser is a little different from your average game. Maybe cut your teeth on one of the other games in this list before coming to this one. The objective is simple: Remove all the items from a condemned house. Of course, it’s not that simple. Here’s the online link.
Good luck, and have fun!
You finish reading the blog post.
>quit
See you next time!
Piano
I came back from my business trip having kept up the ol’ blog, but dropping pretty much everything else. That’s okay, it’s hard to follow a schedule when you’ve got that whole ‘job’ thing going on, so I’m not going to be too hard on myself.
It’s time for a shift-up, anyway. There’s about twice as much maths in the schedule as there should be, and probably too much streaming too. For now, I’ll change one of the maths slots to music! Because music is cool, and the weekend slots are nearly never fulfilled because of various obligations. Thursday 9pm will become Music, and Tumbling will be bumped to 10pm.
So what am I going to do with Music? Well, my first thought was to pick up another instrument. I’ve had my eye on a violin for a while now, but the combination of price and general likelihood of it going unused adds up to a non-purchase (I’m looking at you, harmonica and melodica!). I really should work on my piano.. So, why not work on piano?
Piano practice has always been something I’ve had a rocky relationship with. Like everything else that doesn’t provide instant gratification, piano can become quickly demoralising if you haven’t got the right mindset or approach. I’ve spent quite a long time trying to find a method of practising that doesn’t bore me to tears. I was working quite hard at piano last year until I.. wasn’t. Piano has to be practiced fairly early on in the evening, because once it gets late you don’t want to cause a ruckus. While it’s possible to wear a headset, it’s a cumbersome experience and distracts from the learning. This limitation often meant if I got home late because of work, I wouldn’t be able to practice for the day. That was another thing: Practice was daily, but unstructured. I’d start with random scales or exercises, and then move on to working on a piece. The piece practice was equally bad: I would focus on the bits I’d already done rather than pushing through to the more difficult parts. The end result were pieces that sounded great to start with that quickly fell apart as they went on.
So right now, I’ve put aside one hour for practice on Thursdays. This isn’t even remotely enough to get good at any sort of speed. But we’re playing the long game with these things, putting more time as I want. The plan is to have more structured practice sessions to make up for the reduced time: Ten to twenty minutes of Hanon, playing the previously practised exercises at a slightly higher tempo than last time, provided I was happy with the original practice session. Eventually, I hope to have the first twenty exercises down at full speed within ten minutes. Next up will be the scales of some type (major, minor, chromatic) for another ten minutes, followed by either more scales or arpeggios for ten minutes, ending with twenty to thirty minutes of piece practice.
Scale practice is particularly hard to structure, because there’s twelve major scales, twelve minor scales, scales in thirds, chromatic scales, chromatic scales in thirds… The list goes on. If you only give yourself an hour a week to practice, you won’t be able to cover everything at a reasonable rate. But again, maybe that’s okay, because if piano gets the chop I won’t have burned myself on extraneous practice. The plan is to take a similar approach as in Hanon. Four octaves, starting at 60bpm and slowly ramping up higher and higher if the previous practice goes well. Eventually, the ones that are simple will be dropped and the more challenging scales will remain. Again, this will be repeated for the arpeggios and their multiple versions (major, minor, dominant sevenths…).
The piece practice will involve learning a piece hands separately to the point of being able to write it back down on to a manuscript from memory, or at least a very reasonable facsimile! Then, I will learn the piece hands together, and it will all work out and be wonderful, maybe. There’s a vast amount of disagreement out there on whether you should take on a piece ‘hands together’ to start with, or if you should learn each hand separately. Indeed, over-reliance on muscle memory is also argued to be bad, given that if you can’t ‘see’ the music and you suffer a muscle memory lapse, you’re stuck and have to start back at an earlier point where your memory hasn’t faded and hope it falls together the next time around. Memorisation and gradual practice will (theoretically) let you pick up from a mistake from the bar before the mistake was made.
So what’s the first piece? Well, I wanted to ease myself back in with something I could actually see myself being able to play, so I’ve gone with ‘Linus and Lucy’ from The Charlie Brown and Snoopy Show. It’s so good, and everyone knows it. Afterwards, it’ll be probably a dive back into the classical once I find some exciting pieces that I have to learn. If you haven’t heard ‘Linus and Lucy’, I present it now as a musical ending to this post: