The Rodeo

Last week, I had the unique opportunity to visit an indoor rodeo. It was surreal. I’ll just sum up what happened, maybe talk a bit about how insane it felt.

The arena was probably the size of your average circus, and it was packed. Like, full. This is an event that happens every Friday and Saturday, and they still fill to near capacity every week. That had to be a vote of confidence, right? After what felt like an eternity of sitting around, the MC started his spiel about the importance of rodeo and how it’s a Texas institution and everything. It was interesting, but it took forever. At the end of it, he asked for everyone to stand for the national anthem. Okay, that’s not so weird, right? The strange part came immediately after.

Spotlights lit up the arena as a horse-mounted man carrying the American flag entered. He started to circle the ring, trotting slowly at first. As the anthem progressed, the trot sped up until man and horse were full-on galloping. This was working up the crowd like crazy. I hadn’t seen anything like it: All he was doing was going in a circle, big smile on his face… Red, white, and blue clothes to go with the flag. And the crowd loved it! I got carried away in the atmosphere as well, of course. The same guy would later carry a flag in-between the various acts to come. The only difference the following times was that the flag wore an advert rather than the stars-and-stripes. They sure love flags in Texas.

With the required patriotism dealt with, it was time for the first event. Six or seven young men had decided to take on the bull. The task? Stay mounted on the bucking bull for eight seconds. Just eight seconds. This is impossible, it’s not like those mechanical bulls which slowly reach an unreasonable speed. An actual bull goes from zero to sixty in the time it takes to open the gate. These guys were flying every which way. The moment they fell off, they’d roll, get up, and run the hell away while the rodeo clowns attract the bull’s attention and stop it from kicking the fallen rider’s head off. Amazingly, only one guy managed to hurt himself. He ended up banging his head hard against the gate as he fell off the bull. He could barely walk, and he had blood pouring from a wound on his temple. He tried to wave to the crowd to show he was okay, which ended with him in a pile on the floor. It was genuinely scary.

I heard later on that they do some pretty terrible things to the bulls to get them worked up so much.. It’s not good, and not surprising. It’s enough to make you want to not go again, you know?

Anyway, after the riding there came another event. This time, they let a young cow loose from one end of the arena while a horse-mounted cowboy attempted to lasso the cow’s head before leaping from the horse, throwing the cow to the ground, and binding its legs. This is weird to describe and even weirder to watch. The scary thing here is that the fastest one guy did all this was nine seconds. It looked like a scene from a western, which I imagine may be the point. The strength these guys had to throw the cows down must have been huge. It did not look very comfortable for the cow nor the cowboy.

Then, after a few failed attempts, a few successful ties, it was time to move on to the intermission. And this was when the night got bizarre.. bizarrer, rather. The MC asked for all children aged between 7 and 12 to enter the arena. I was already getting a huge Battle Royale/Hunger Games vibe, but no. The actual event was even more questionable. Once the kids were in the ring, they were lined up along the centre. There must have been about fifty children in total. The objective was then described by the MC: A single calf was to be let loose in the arena with a sticker on it. The kid who managed to get the sticker won a prize. Yes, that’s right. Fifty children versus one calf. It was like watching ’28 Days Later’. There was strategy involved, some of the children running towards where they expected the calf to be, rather than where it was at the time. Once the calf was cornered, you couldn’t see what was happening to it. That’s how the dense the child-cloud was around the calf. At the end of the ordeal, the calf seemeed fine, if stressed. One kid nearly got trampled by all the others.

Post-intermission, it was time for more of the same. There were variations on the previous themes: More bull-riding, more cattle-rustling.. And the return of the popular ‘children chase animals for prizes’ game, this time with a lamb and children aged under seven.

I’m not sure how I feel about the whole thing, in the end. It was definitely entertaining, if morally objectionable at times. It’s probably a see-once-never-again sort of thing. If you like animals, I wouldn’t recommend it. I have a few pictures, I’ll update this post when I get a chance.
On Pretending To Write

Just a short one today, I’m in Dallas and it’s really nice! Very warm.

Let’s talk about writing. Writing is pretty fun, I recommend it if you have the time (and everyone has time). But what’s the point? And what should you write about?

I’m not a very good writer, at all. It’s difficult to be a great writer when you’re so good at being concise, or when other people have already written what you wanted to write, but a hundred times better. Being a mediocre writer is not an excuse for slacking off and giving up, however. Virtually everyone starts off at the same level of awful, so it’s often just a case of showing up and putting in the effort. This is true of everything, so we’re not really exploring writing specifically right now.

So with writing, what’s the step-by-step to becoming better? Of course, it depends on what your goal is. If you want to be a fiction author, you need to spend time learning the fundamentals of story telling. If you want to write a successful blog, you need to have a clear vision for the content you want to provide. Both require practice, but sometimes it’s harder to write one style over the other.

For instance, right now it’s easier to write a blog than it is to write fiction, because right now most of my energy is spent on work things. I get home, and the last thing I want to do is try and construct a worthwhile narrative. Rather, I’d like to whine and moan and vent. What better medium than that of the humble blog? But alas, moaning is not the order of the day.

I want to become a better writer. To that end, I have TWO writing based activities in my timetable. One: I write a blog post every week. Sure, they’re not great, but every post is a step in the right direction. Two: I try and plan out stories. Proper fiction. I’ve read more than my fair share of fiction writing guides, so it was high time I actually tried to push out a real piece of work. Both activities have their own challenges: Writing a blog post needs a subject, writing fiction requires an imagination. I lack both, but my eleventh hour superpower is finding something to write or muse about, so that’s handy.

Writing non-literary fiction isn’t ‘hard’ in the sense that you have to brave the dark, cold world of authorship alone. It’s a well-trod path. There’s theories of story-craft already devised and waiting for you to apply them to your writing. Let’s go through, very quickly (because it’s far too late), the first three key structure points that your story has to hit before it can be considered sound:

1) The Opening, and Hook – In the first twenty or so pages of your novel, your protagonist must appear, and something exciting that entices the reader to keep reading. For instance, the introduction of a compelling setting that demands further attention (think The Fifth Element, Final Fantasy 7).
2) The Inciting Incident – The event that pushes the whole plot into motion. In The Lego Movie, this is when Emmet finds the Piece of Resistance, shifting his whole life from the usual ‘follow orders, tow the line’ ordinary to the dangerous, thrilling adventure that is the quest to keep the Piece from falling into the wrong hands.
3) The First Plot Point – The moment that everything changes, and that change defines the goal of the main characters. In The Lord of the Rings, Frodo steps up and declares that he will bring the Ring to Mordor. Note that he had only previously agreed to take the ring to Rivendell. His resolve to continue the quest defines the First Plot Point, and drives the remainder of the story.

And then.. Well, that’s for another time. Indeed, the significance of each milestone is also currently a mystery to you, my reader. I recommend checking out Larry Brooks’ Storyfix website for more information while you wait!

Willpower

Here we are, after a successful week of sticking to a timetable! Already, things are looking up.

The subject today is, perhaps unsurprisingly, willpower. I thought I’d share a little bit about what I’ve learned about willpower. Having managed to not slack off in my free time for a week, I am now clearly a paragon of strength in an harsh, unproductive world.

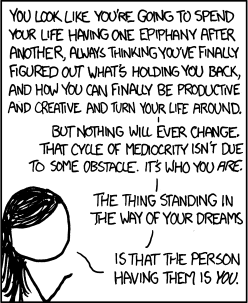
I worry that this is another abortive attempt to kick myself into gear. Indeed, having failed in the past with similar endeavours, coming across this panel from xkcd was bit of a downer:

HarshWordsFromxkcd

I spend a lot of time thinking about this single panel. Seriously, it’s one of the most horrible things I can think of. But you know, either you eventually figure it out, or you keep trying until you can’t any more. So let’s keep trying (’til we run out of cake)!

What is willpower, anyway? The American Psychological Association partially defines it as “the ability to delay gratification, resisting short-term temptations in order to meet long-term goals”. I’d like me some of that! So I’ve been working on it.

As I said earlier, this past week was really good for sticking to a timetable. I’ve started going to bed earlier, getting into work earlier, and overall ending up with more productive time than I would have by getting in late and staying up late. In a way, 7:30am and 12 midnight have become the anchor points of my day. This brings me neatly to the first actual thing I want to talk about.

The Power of Habits

That’s probably the title of a book by Tim Robbins, but hopefully no one is going to be suing me. But yeah! It turns out that there’s been studies (or more likely, a single study that has been blown out of proportion) that suggest a correlation between building habits and an increase in willpower. The study in question measured willpower as a function of how well the participants performed in specialised tasks before and after starting to visit the gym regularly. I didn’t read it myself, but rather read a regurgitation from the wonderful Jason Shen of the conclusions of the study.

It’s not just people who actually do science for a living who have decided this. Indeed, there are many, many articles out there that claim that you too can become a productivity powerhouse by simply adopting a set of habits, without citing a single academic paper! But science is overrated anyway, right? Just prepare yourself to get things done, and good things will come.

Habitually picking up habits

So what habits did I pick up? Well, the timetable itself is a habit, just like going to the gym except a bit larger in scope. It makes it easier in general to get started with things, because you know ahead of time pretty much what you’re going to be doing and for how long. Because I don’t have to think (which is awesome, thinking hurts my drain), I find myself with fewer excuses to not sit down and get started on the task at hand. So that removal of choice that comes with picking up a timetable as a habit.. Definitely seems to help. The results will speak for themselves in a few weeks time.

The timetable itself hints at another key habit I’ve stuck to (mostly, give or take an hour here or there): Regular bed times and regular wake up times. I’ve always resisted bed time. Like, as long as I can remember, I’ve tried to stay up as late as possible. Back at university, it wasn’t uncommon for me to be up at 3am on days where the lectures started late. But in fact, maybe that wasn’t such a great idea. Sure, you stay up later, but you also wake up later. Depending on how much your body likes sunlight, you’ll deprive it of valuable daylight hours where you could be getting stuff done! Also, some things can only be done before it’s too late in the day (for instance, I can’t really play the piano past 10pm. Can’t really play it before 10pm either, bazinga). The main benefit however, is that it’s a habit. You don’t have to worry about wondering what time you’re going to bed (and no, it isn’t ‘when you’re too tired to stay awake’, Old Matt), because when the time comes.. You’ll just go to bed. Bonus: Sleeping at regular times helps your body get more rest, and helps you get to sleep!

Other than the timetable and sleeping , I’ve picked up a couple of other ‘good’ habits: I sit up straight when I catch myself slouching (which apparently has its own benefits). I make the bed! Well, I throw the covers back on the bed and flatten it out a bit. At least it’s more presentable than it usually is. Will these micro-habits help out in the long run? I would guess.. probably not. But I’m not a psychologist or anything, and given how they’re not exactly draining, I’ll probably keep them up for a while. Will automatic behaviours help save my energy for when I actually have to think? Sounds good to me, not sure how measure their effect though.

Willpower as a Muscle

Speaking of ‘saving energy’, willpower has been characterised as a muscle quite a bit these days. Effectively, those clever psychologists say that willpower may be thought of an exhaustible resource. I haven’t really been monitoring my ‘willpower’ level, but I can confirm that the longer I spend doing something, the less energy I have for other activities. I guess this is both physical energy, like ‘awakeness’, and mental energy, like willpower.

If we keep the ‘willpower as a muscle’ analogy, then we have to expect that over time that willpower will either grow in strength, or atrophy depending on one’s actions. My willpower isn’t perfect. I can’t resist sneaking in the occasional break (which is no bad thing, being a machine is probably detrimental to your health). I definitely feel like this whole analogy has some merit though, it was easier to sit down this week to write than it was last week. Then again, that could be down to any number of factors. You may have realised by now that this is not a blog for people who want controlled measured experiments. I love those! But I’m a a terrible record keeper. Maybe that’s another good habit I should try and build up? It’s not like we’re not spoiled for choice when it comes to life tracking. Indeed, you can’t swing a cat for all the fitness doo-dahs.

Going back to the ‘problematic’ breaks: I try and have ‘productive’ breaks. By that, I mean that even my breaks are useful in some way. Indeed, I think in general there’s very few ‘brainless’ activities. For instance, I might sit down and watch Friends for half an hour. Doesn’t sound productive, right? Ah, but I watch it in the Original Japanese. You people watching the American dub have no idea what you’re missing. Jokes aside, breaks are useful for restocking some of that willpower, even if it’s something as ‘unproductive’ as sitting down to watch Joey and Chandler chat about garbage. I believe taking too many breaks will give diminishing returns, but the occasional break is almost certainly a good thing, especially if you can find a way to make it useful, as championed by Khatz of All Japanese All The Time.

When using the Pomodoro Technique (named after the novelty oven timer) for working in blocks of time, you sit down for 25 minutes and work on one thing and ONE THING ONLY. Then you take a five minute break, and repeat. And you keep doing this! Occasionally, every four or five cycles you give yourself a longer break. I tried the Pomodoro Technique for a while back in the day, and while it was nice, there aren’t that many things where I can feel accomplished during my breaks that only take five minutes. Of course, I’m missing the point of breaks. I might have to give it another go in the future with fresh eyes and renewed motivation!

That’s It!

So yeah, you now know pretty much everything I know (or believe, as the case may be) about willpower. Just remember there are no silver bullets. I want to believe that there is a method out there that will work for me and keep me productive. I hope regular habits and staying healthy is the way forward in this regard, but even if it isn’t: I’ll have picked up some good habits (hopefully) and ended up healthier for it. And those things alone would have been worth the time spent trying to improve myself. And if this turns me into the productive powerhouse I want to be, then awesome.

Focus

This post has very little to say, but I need to write it anyway. It’s a long ramble about where I’m at now, and where I want to be.

So, that little video game project didn’t pan out so great in the end. But you know what, that’s okay. I learned a lot about Python, Curses, and getting things to work on both Windows and Linux. Here’s a tip: It’s a pain, don’t bother. But as far as difficulties regarding getting a console-based game to work cross-platform go.. The only tricky bits were making sure the character encodings were set-up nicely across both platforms. The down-right DIFFICULT part was getting Curses to work on Windows at all.

Anyway, that was in the past. It’s time to look forward! Another abandoned project, but maybe that’s okay. I spend more time than I’d like sitting down regretting idle, wasted hours. The big problem with lamenting wasted and lost time is that the lament is often a waste of time itself. When I get in a slump, I remind myself that I’m not number one yet, so I have to try harder.

So I’ve started another endeavour. Yes, another one. It’s near the bottom of this post. I never follow through or finish anything, but maybe it’s time to change that? Looking back at unfinished project after unfinished project, it’s easy to fall into the trap of losing faith in yourself. I’ve lost faith in my own ability to finish things so many times, but I always manage to claw back some self-discipline and self-respect to try again. However, these salvaged feelings are suffering from diminishing returns. You can only fall so many times before you stay down, right?

Over time, I’ve become quite good at starting things. And if it’s not a huge thing, I can follow through without too much problem. For example, roughly a year ago, I sat down with a Rubik’s Cube for the first time. Within a few months of playing with it, devouring the vast amount of cube-related information, I was able to solve the cube. Fast. Like, forty seconds fast. Technically kind of slow compared to proper cubers, but you know. That was easy, because it’s just memorisation and repetition. After a while, you switch your brain off and idly practice on the bus or train, letting your fingers do the work while you think about what you’ll make for dinner.

There’s a few things about having learned the cube that bother me:

  1. I can’t tell you why I did it, other than ‘it looked kind of cool and seemed like a fun idea at the time’.
  2. I have absolutely zero use for a skill like that.
  3. It was one of the only things I finished.

Why would that last thing bother me? Well, it’s such a useless thing, completely inconsequential. It has not changed my life in any way. If I used that energy differently, I’d have a finished game (or maybe two) under my belt. At the same time, it’s okay. I want to be one of those amazing people who only do useful things, but maybe that’s an unrealistic ideal. Time will tell.

I have things I want to learn, things I want to do. Some useless things, and some useful things. Knowing the cube? Useless, but fun. It’s nice to watch people’s lips curl into a smile after they watch me solve a cube. I want to learn a foreign language. I want to write a book. I want to ride a unicycle (and maybe solve a cube at the same time?). I want to be better at physics. I want a perfect body (I want a perfect soul).

I never really considered that there wouldn’t be enough time. I didn’t consider that I’d have no willpower, or the attention span of a hyped-up kitten. After a lot of thought, I’ve identified these as the key problems:

  1. Willpower.
  2. Time.

The book ‘Mastery’ by Robert Greene claims that every human being has a calling deep inside them, they just have to find it. They’ll just ‘know’ when it comes, and they will be able to draw strength from this calling. It will be their muse and their motivator. It’s a romantic notion. I haven’t found that thing yet, and to be honest, I’m not really buying into the idea that it exists for even half of people, let alone all of them. So that willpower has to come from somewhere else, or that one thing has to be found.

I’m told by the Internet that a person needs 10,000 hours of practice at an activity before they can be considered ‘a master’. To put that in to perspective, you would have to train every hour of every day for over a year to reach that number of hours. If you spent seven hours a day working on your activity, it would still take over four years to reach the lofty height of master.

So we can’t waste time. If you’re going to become brilliant at something, you have to work at it. The problem is that you need to want it, and you can’t want to stop. That is so hard! It’s one thing to persevere through pain and difficulty, but it’s another thing to want to. Like, it’s the difference between studying because you need to graduate and get a job, and studying because you want to actually know the material and have a deep understanding of the subject for the sake of it.

This means we need to find what we want to do, soon. Earlier than soon, we’re talking like years ago. Probably should have figured out at least one thing to focus on by now. I knew I wanted to go to a good university, but that wasn’t an end goal in itself. I just had no other plans. And then I had to get a job, because that’s just how life is unless you’re pretty brilliant (or lucky).

I’ve rambled enough, so here’s the plan: I’ve put together a timetable. It’s not perfect, and it’s not meant to be. It is subject to change. I will spend my time a little more productively than I have in the past. I’m not going to try for miracles. I know better than anyone that my weekends are likely to fall apart. I know I couldn’t spend more than a few hours a day focusing on things right now. Hell, there’s hardly three hours per night anyway.

So that’s at least one hour a week on a bunch of different things. That won’t help me become ‘a master’ in any of these disciplines. Or rather, it will. In about 190 years, I’d expect to be amazing at all of the stuff in my timetable! The idea is to weed out the activities I don’t find interesting, and give more time to the ones I do enjoy. Some activities are ‘larger’: ‘Maths’ and ‘Tumbling’ refer to the full disciplines of studying vector calculus, classic mechanics, contact juggling, riding a unicycle, and so on. I feel I want to be good at something in those areas, I just need to find out what. Others are more concrete, like ‘Blog’. Guess what time it is? The subject of each post isn’t set in stone, but the activity itself is known ahead of time.

Writing out the timetable was a horrifying experience. Subtracting all the time for work, eating, and sleeping, I’m left with maybe six hours a day, out of sixteen, seventeen waking hours.. But hey, that’s almost seven right? If I can find something I’m so enthralled with, that I only want to do that one thing.. Mastery is only years away.

The timetable is set for a reason. With past projects, it’s always a very ‘if I have time’ deal. Or worse, procrastination has reared its ugly head. “I’ll start this later, I need to finish this YouTube video first”. At first glance, setting things in stone seems to be detrimental to willpower as a whole. But I’m trying out a technique of habits. I want to practice things regularly, at set times. Or at least, in the same order. I want to take the choice of ‘what to do, when’ out of the equation, and focus more time on actually doing stuff.

For instance, it’s now 10pm, the end of my blogging hour. Next up, I’ll be reaching out and talking to people. About what? And to who? I have no idea, but the point is to just try. See what happens, maybe end up with a more specific goal for next week.

I’ll sum up quickly: I’m horrified and saddened at at how terrible I am, and how awful I am at stuff. In general. I have very little to show for twenty five years of living. That Rubik’s Cube has become a symbol of the pointlessness of everything I set out to do.

It’s not all doom and gloom. I said before that I always get up and try again. And that’s what I’m doing now. I will work on my willpower, and I will find a calling, something I want to do more than anything else. And even if I don’t, at least I’ll have spent my time doing things I want to do, and even some things that might actually be useful in the future.

That’s it! The most narcissistic post I’ve ever written.. Since I was like, thirteen or whatever, on the LiveJournal. If all goes according to plan, I’ll be back next week. I have no idea what I’ll write about now, and that’s both scary and exciting. If there’s no post here next week, I will have failed.

Rogue Detective Part 2 – Curses!

Last time, we covered the rather ridiculous choices that led up to my decision to write a roguelike from scratch. Now, we’ll cover the first steps in the creation of Rogue Detective, and indeed, most games I write.

After the standard step of creating a new repository for source control comes the creation of the first source file. This is usually the most daunting part of development: Opening up your editor and seeing a completely blank file that needs to be populated. Step one: Save this blank file as ‘main.py’. Great, we’re half-way to finishing the game, but there’s no time for a break quite yet.

I already knew we’d be using the curses library, so a good first step would be to import it. Additionally, I wrote a barebones do-nothing main function and uses a curses utility function to call it. At this point, here’s the totality of what I had:

import curses

def main(stdscr):
    pass

if __name__ == '__main__':
    """Handles all the nasty stuff to do with curses set-up + tear-down"""
    curses.wrapper(main)

As part of the wrapper function, the main is called and passed a variable called stdscr. This is a curses Screen object. This is our canvas upon which we’ll draw our player character, NPCs; the world, basically. This will be passed to the object that controls the world, so it can also control the canvas. Calling the function via the wrapper serves a couple of purposes:

  1. The wrapper handles all curses set-up and tear-down, as mentioned in the docstring. It will initialise curses and set up various desirable cursor attributes such as disabling echo and enabling instant keyboard inputs. After the passed in function has ended, it shuts down curses gracefully.
  2. In case of an unhandled exception in the called function, the wrapper will catch it, shut down curses correctly, and then re-throw the exception. This prevents such a crash from destroying your terminal settings.

I went in to this particular stretch of work with the goal of having my character (an @ symbol) move around the screen controlled by the arrow keys. With the program successfully bootstrapped and in a ‘working state’, it was time to accomplish that goal.

I wanted to keep the main function as lightweight as possible, leaving it as only the entry point to the application and nothing more. I accomplished this by writing a Game class which the main would instantiate and then call a function of. In this case, the function is called mainLoop, and as you might expect, it is responsible for controlling the game loop itself. Before we get in to that, let’s examine the members of the Game class.

class Game:
    """The game logic itself. The loop and input handling are here."""
    def __init__(self, screen):
        """Create the screen, player, assets."""
        self.screen = screen
        self.running = True
        self.player = Player()

So all we have right now are variables for storing the aforementioned Screen instance, another for storing the state of the game (running, not running), and one containing a currently mysterious Player object. How about that mainLoop I mentioned?

    def mainLoop(self):
        """Run the game while a flag is set."""
        while (self.running):
            self.logic()
            self.draw()
            self.handleInput()

As long as the game is running, we run all the logic for the game, draw the resulting position, then wait for player input.

    def logic(self):
        pass

No game logic exists at this point, so logic is an empty function.

    def draw(self):
        """ Draw it all, filling in the blanks as necessary """
        self.screen.erase()
        player = self.player
        self.screen.addstr(player.y, player.x,
                           player.character, curses.color_pair(1))
        self.screen.move(player.y, player.x)
        self.screen.refresh()

draw actually does something useful. It clears the previous screen, grabs the Player object, draws it in the right place, and finally moves the cursor to the player’s position. That last step is one of the many niceties of a console-based roguelike: if we don’t put it directly on the player character, there are two problems:

  1. If we don’t uniquely colour the player character, the player (user, not game object) won’t be able to identify his character if multiple objects share the same symbol.
  2. If we don’t put the cursor on the player character, it has to go somewhere else. And where else would we even want to put it? It needs to go somewhere. Because of problem one, it makes sense to place it on the player character when possible.

    def handleInput(self):
        """ Wait for the player to press a key, then handle
            input appropriately."""
        character = self.screen.getch()
        if character == ord('q'):
            self.running = False
        elif character == ord('h'):
            self.player.move(Direction.LEFT)
        elif character == ord('j'):
            self.player.move(Direction.DOWN)
        elif character == ord('k'):
            self.player.move(Direction.UP)
        elif character == ord('l'):
            self.player.move(Direction.RIGHT)

Given the turn-based nature of the game, there’s no need to do anything particularly clever like pump event queues or have time-out functions. We explicitly wait for the player to input a character via a Screen function, check the result against the list of characters we’re expecting, and perform the associated action if we get a match. In this case, we call one of the Player functions to move the character around the screen. You’ll also notice we pass in an enum. In Python, enums are usually just static class variables grouped in a class that becomes the enum’s name:

class Direction:
    """An enum for the possible movement directions"""
    UP = 1
    DOWN = 2
    LEFT = 3
    RIGHT = 4

In this case, nothing clever is going on: An enum of four elements in declared for the four directions of movement. Let’s cover the Player object now:

class Player(object):
    """The player object, containing data such as HP etc."""
    def __init__(self):
        """Initialise the player object"""
        self.x = 20
        self.y = 30
        self.character = '@'

At the point in development, the Player contains only information strictly required to render it: Its position on the screen (y, x) and the character we should use to represent it. This is used by the draw function in the above Game class. It has a single member function:

    def move(self, direction):
        """Move the player one unit in the specified direction"""
        if direction == Direction.UP:
            self.y -= 1
        elif direction == Direction.DOWN:
            self.y += 1
        elif direction == Direction.LEFT:
            self.x -= 1
        elif direction == Direction.RIGHT:
            self.x += 1

This gets called by the handleInput function, and moves the player in the given direction. I should probably mention that this code will let you move the player character out-of-bounds of the Screen object. This throws an exception and crashes the program. Additionally, you can’t move to the bottom-right most part of the screen, for a much more subtle reason: Curses will draw the @ symbol in the very last available space, but then attempt to move the cursor along to a location that doesn’t exist in the screen space. Both of these problems will be fixed later on.

At this point, we can revisit the main function and see how we incorporate this new Game object. There’s no surprises here:

def main(stdscr):
    """Initialises the Game object and basically gets out of the way"""
    stdscr.bkgd(' ', curses.color_pair(0))
    game = Game(stdscr)
    game.mainLoop()

We set the ‘background’ to be made up of blank characters. If we ever erase the screen, it is actually filled with the background character, as set by the bkgd function. We then instantiate and start the game.

That’s it! The actual code looks a little different for the first commit (there’s a superfluous class floating around, and some of the code has been changed here for clarity). How does it look? Well, take a look:

FirstCommit

In the future, we won’t cover whole commits. Indeed, we won’t cover each commit, but rather the functional milestones of the project. Hopefully you’ve gained a little bit on insight in to how a Python curses project starts life. Next time, we’ll look at the implementation of walls and other standard obstacles you tend to see in roguelikes.

Rogue Detective Part 1 – A Defective Rogue

Rogue Detective started off as an attempt at the annual 7 Day Roguelike competition, wherein one aspires to create a full roguelike in a mere seven days. Entrants are allowed to use previous work, provided the final game is a new roguelike unto itself.

This year, the competition fell in one of the two weeks of my holiday from work. Being one of the many proud staycationers so prevalent in England, this meant I would have the full week to develop a game! I heard about the competition one day in advance of its start, which gave me a little bit of time to start mulling over a few ideas I had.

At the same time, I started considering at my options regarding development. I already knew what my editor would be: Emacs, of course! I figured if I was going to pull this off in a reasonable time frame, I’d need to use a language I was comfortable developing in. That meant a choice between C(++) and Python. Given how I’d recently worked on a Python game, the language was still fresh in my mind. Indeed, for speedy development I am in general more comfortable in Python.

Editor sorted, language sorted.. Now I needed to consider what libraries might exist out there to help me. I vaguely remembered NetHack using the curses library for terminal stuff, so the first thing I did was check for Python bindings. Sure enough, a Python library for curses existed. At this point, I hadn’t even considered a graphical roguelike. I knew I had no chance to produce something pretty, so I would stick to ascii. I started work on getting an @ symbol wandering the void. This is not the most thorough approach to library selection, but yeah! Limited time means limited research.

I hadn’t quite realised what I was undertaking: A complete roguelike from scratch, save for terminal character manipulation. Given only a week, surely the typical entrant would have to take the whole time to finish something even remotely playable, eschewing work and a social life?

Meanwhile, my friend Ariff was considering entering the same competition. The first thing he did was check for the already existing roguelike libraries that could help. Of course! Why wouldn’t something so obviously useful exist?

For Python, there already exists the libtcod library. Rather than build everything from scratch, libtcod provides users with useful functionality such as built-in dungeon generation, pathfinding, line of sight algorithms.. And to top it off, the whole thing is portable: Rather than build off a terminal-based library, it uses the SDL library. So while programs now have to run in a non-terminal, there’s very little messing about with getting games working on multiple platforms AND with full colour!

So it’s a no-brainer, right? Using this library, I’d be able to get to work on the meat of my game idea immediately! Maybe this wouldn’t be such an impossible task after all.

Of course, I’d already gotten an @ symbol walking around.. And it would be a shame to waste ‘all that work’.. Long story short, I made the questionable decision to continue with my own ‘from scratch’ engine. This was probably due to a mix of hubris and ignorance. Sufficed to say, I didn’t finish in seven days. It turns out that unless you’ve implemented things like path-finding and field of view before, they can be more than a little time consuming!

So the dream of a roguelike in seven days was dead on arrival. But this wouldn’t kill the dream of a roguelike in totality. Over the past month I’ve continued to work on my little game, and over the next few posts I’d like to go through some of the basics of roguelike development using my repository’s history to guide us. It will definitely not be a guide on the proper usage of source control (one branch for life!), but I think maybe it’ll be useful for me to solidify the process and maybe useful for people reading if they want some insights on how a newbie might write a roguelike.

Getting Virtual with Emacs (Part 3)

Last time, we talked about the two emacs extensions I use to emulate my most used features of Sublime Text. Even a cursory look at the manual would show way more features than I even thought about using, but by learning basic editing in emacs I’m already able to fully switch over to the Gnu editor.

This time I’m going to write about the cool stuff I’ve installed in emacs that you don’t see in the standard Sublime installation. Maybe Sublime has support for some of these functions, but not out of the box.

Magit

Magit allows you to control git from inside emacs. ‘But Matt,’ I hear you cry, ‘I can just leave emacs if I want to do git stuff! Why do I need this package?’ If I had to give you a a good reasons.. The whole thing is a pleasant user experience. Magit itself manifests as a new buffer splitting your window, listing the current status of the repository. Asking for a diff gives you the diff in another buffer; committing causes the commit message to open in a new buffer.. It’s very self-contained inside emacs. You don’t have to leave emacs for any part of the staging/committing/pushing, so you never have to break your flow. Even if you want to run an arbitrary git subcommand, Magit has you covered: The ! command while in the Magit buffer lets you specify subcommand you want.

But why alt-tab out to your terminal, then type ‘git commit -a’ only to be thrown back in to emacs for the commit message? Then you have to go back to the terminal to type ‘git push’.. What a chore. With Magit, I can just hit my Magit key binding (C-x C-a), then ‘c’ for commit, ‘-a’ for ‘add all unstaged files’, ‘c’ again, and I’m in a buffer where I can write my commit message. Write the message followed by C-c C-c to complete the commit. Then I just have to type ‘P’ twice to push, enter my SSH key-phrase, and that’s it.

Sure, Magit is definitely more of a convenience package than something that will supplement your coding skills, but it’s such a great convenience I can’t see why you wouldn’t want to use it!

Yasnippet

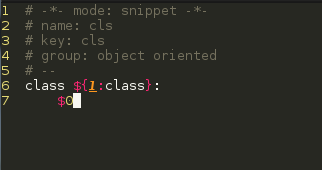
This one is a little unfair, because Sublime has support for snippets, and I just never really used them. Anyway: Yasnippet by João Távora allows you to use snippets when coding. Snippets are blocks of (usually) often used code that you can assign a shorthand command for. These commands take the form of a sequence of characters typed in to the editor followed by a tab. For instance, when writing Python I could type ‘cls’ followed by a tab and cls would be replaced by:

Yasnippet1

Emacs highlights ‘class’, ready for me to type the new class’ name. Once typed, I press tab again and I’m done. Snippets can contain more than one field to modify. In that case, tab moves you to the next field.

That happens to be one of the snippets you get when you first grab yasnippets via the package manager. It’s very simple to write your own, and dare I say, easier than writing the equivalent template in Sublime. The snippet above is defined like this:

Yasnippet2

If we wanted to save ourselves even more writing and not have to worry about writing the usual init function, we could modify it like so:

Yasnippet3

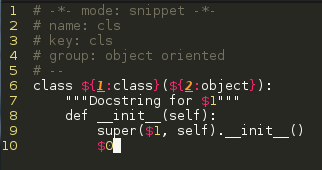
Notice how I’ve referenced $1 in two places and added a second field for us to potentially modify for when the new class is a subclass. By referencing a field more than once, the field is mirrored in other places. Expanding the snippet now gives this:

Yasnippet4

Notice how I’ve typed ‘Woah’ and it has automagically appeared in other places! Pretty cool. There’s a lot of potential in snippets to unlock, and they can save you from large amounts of typing. They’re a great feature to have, and I can’t wait to think up some useful snippets to improve my workflow.

Ace-jump-mode

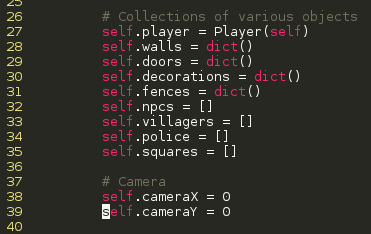
One of the simplest packages on this list, ace-jump-mode by winterTTr is one of the most difficult to explain. Functionally, it’s a method of moving the cursor to the beginning of any word on the screen. The way you use it might seem weird at first, but it quickly becomes second nature. In this screenshot, my point is at the bottom of the screen but I want it to jump up to the creation of the Player object, because I just remembered I renamed that class.

AceJump1

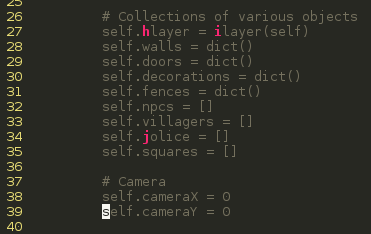
Rather than move the point all that way (a whole 12 lines, so much effort), I can activate ace-jump-mode with my key-binding (Ctrl+C SPC), type the first letter of the word I want to jump to, and bam:

AceJump2

Ace-jump-mode now finds all instances of the chosen letter on the screen when it appears at the start of a word, and labels them with a letter of the alphabet. In this case, I want to jump to Player, so all I have to do is type ‘i’ and the point will jump to that location! I think it’s pretty neat in its simplicity, and saves some tedious point moving action you’d otherwise be doing.

That’s pretty much it! Before I finish this post, I’d like to take a little while to help out anyone having problems combining some of the packages discussed in these posts.

Jedi.el and multiple-cursors.el

These two packages get along quite well until you have multiple cursors active and decide to type a dot. Upon seeing a dot, Jedi.el decides to attempt to call auto-completion to help out with class methods and the like. However, multiple-cursors explicitly disables auto-complete mode because auto-complete doesn’t play well with it. The end result is that an error is thrown on typing dot, so only the first cursor actually types it. This is problematic, but I have a solution! In fact, I’ve submitted a pull request to the multiple-cursors.el repository that was recently merged. But for you people who don’t want to upgrade multiple-cursors to the latest pull or want to wait for a new release, here’s another solution that you can add to your .emacs after your normal multiple-cursors set-up:

(setq mc/unsupported-minor-modes '(auto-complete-mode flyspell-mode jedi-mode))

After adding this, you can type dots to your hearts content, even when using jedi.el! Enjoy.

Yasnippet and auto-complete.el

While not mentioned explicitly here or in the previous post, Jedi.el uses auto-complete.el for its auto-complete interface. Sometimes you’ll want snippets to appear in the auto-complete list. By default, auto-complete.el is coded to not include a yasnippet source. A source is just an abstraction that provides suggestions to auto-complete.el, with the actual method of finding said suggestions hidden inside the source itself. With a bit of tweaking, we can have snippets appear in all auto-complete suggestions regardless of mode by forcing the yasnippet source to be loaded in all modes. This is typically desirable behaviour, because if we have snippets for a mode, we usually want to use them! To do this, you need to add a hook to the auto-complete-mode in .emacs:

(defun ac-always-add-yasnippet-source ()
(add-to-list 'ac-sources 'ac-source-yasnippet))

(add-hook 'auto-complete-mode-hook 'ac-always-add-yasnippet-source)

Alternatively, you can add hooks on a per Major mode basis instead. For instance, you can add the same function as a hook to Python mode by replacing auto-complete-mode-hook by python-mode-hook.

That about wraps it up for this post. If I find a really cool emacs package that I have to shout about, I’ll be sure to mention it. Otherwise, next time we’ll be looking at Rogue Detective (working title), my really-kinda-lame-but-I-like-working-on-it Python roguelike developed in emacs!

Getting Virtual with Emacs (Part 2)

It’s been just over a month since I started properly developing in emacs, both at work and at home. I think it’s about time I wrote a little about my experiences.

First of all, while I’ve used vim daily at work, I don’t claim to be a vim power-user by any stretch of the imagination. Sure, I know how to navigate around quickly, and how to perform some basic editing, but I’m nowhere near the proficiency required to consider oneself a true user. For instance, I’m pretty terrible at VimGolf! When doing some heavy duty coding, I worked in Sublime Text 2. Even in Sublime, for me it was more about the syntax highlighting and pretty interface than it was about its cool features (with the exception of multiple selections). Like many beginner programmers, I haven’t yet took the time to learn my environment. Or any environment, for that matter! After watching some cool emacs videos, I decided I wanted to properly ‘learn’ emacs, and not just use it in the same way I use vim (in that case, why even try emacs?).

The question was: Could using emacs help my productivity? Sure, it wouldn’t help me think up or reason about code faster, but when an idea finally does pop in to my head, the last thing I want is for my editor to get in the way. In fact, an editor that could help me express my ideas faster than other editors would be a boon.

My first experience with emacs was with the in-editor tutorial. It teaches you how to move the point (cursor) and how to perform simple editing. The tutorial barely scratches the surface of emacs, but it does ease beginners into editing with emacs in a gentle, easy-to-follow fashion. After blowing through that and wondering what all the fuss was about, I would find the real power of emacs comes from its extensibility.

Emacs extensions

While emacs is a powerful editor in its own right, the huge amount of community support means that regardless of what language you’re using, someone has written an extension to make coding in it easier. If they haven’t (they have), rolling your own is just a case of applying your Lisp knowledge to the emacs equivalent, elisp. Don’t know Lisp? After spending enough time with emacs, you’ll at least have a good enough grounding in elisp to understand the odd bit of proper Lisp code, and enough knowledge of elisp to be writing your own little bits of code to enhance emacs. I realised that all the cool things in those videos I was watching were often showcasing packages (extensions) for emacs.

My first big programming project using emacs is a Python roguelike that I’ll talk about in future posts. Having written my previous Python project in Sublime Text, my first aim was to be able to do in emacs what I could do in Sublime. This turned out be simple, given how I’d barely given Sublime a proper workout in the first place. I wanted half-way clever auto-complete functionality, multiple selections, and a colour scheme that wouldn’t melt my eyes. After getting the basics out of the way, it would be time to explore the larger world of emacs.

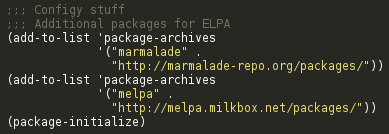
As of emacs 24, emacs comes bundled with a package manager. It turns out there’s more than a couple of repositories for emacs packages, and it’s simple to add them to your emacs package list:

Packages

Once that’s sorted, you can bring up the package manager by using the ‘list-packages’ M-x command and browse the huge variety of packages available at your leisure:

Yes, 2048 has even invaded emacs

Jedi.el – Python Auto-complete

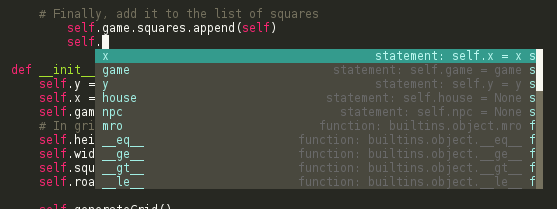
In my Python setup, the Jedi.el package provides auto-completion. It’s a really clever piece of kit. Jedi.el will not only offer auto-complete suggestions based off the history of the file (giving auto-complete options for words already typed), but thanks to integration with a Python server called Jedi, Jedi.el will also have knowledge of your classes and function definitions. For instance, if you’re writing a method inside a class and type ‘self.’:

Jedi.el Autocomplete

Jedi.el and Jedi will be able to figure out your class’s variables and functions and offer auto-complete suggestions. This is seriously useful. If you’re writing code and forget what arguments to pass to a function, you’re also in luck:

Jedi.el Function Signature

So yeah! Overall, Jedi.el is a really neat package. It has a few other features I haven’t tried out too much yet (‘goto definition’ for instance), but I’m looking forward to exploring this package a bit more. Installation was a bit more involved that most emacs packages, requiring some pip action to get the external Jedi server installed. But in fact, Jedi.el came out with a new version that makes installation simpler than before, so even that’s not really a valid criticism. Here’s how Jedi.el is set-up in my .emacs. In the latest version, the setup-keys variable isn’t required.

JediSetup

multiple-cursors.el – Multiple Selections

multiple-cursors.el is written by the wonderful Magnar Sveen of Emacs Rocks!. He’s produced a video about it that can explain it far better than I could hope to:

Installation is as easy as downloading the package via the package manager and inserting a few key-bindings in to your .emacs:

Multiple Cursors Setup

Sublime Text and Vim look-and-feel

I really like how Sublime Text’s default theme looks. I also love the simplicity of the Vim interface. Emacs, out-of-the-box, looks positively crowded compared to the very clean, empty Vim interface, as demonstrated by the last article:

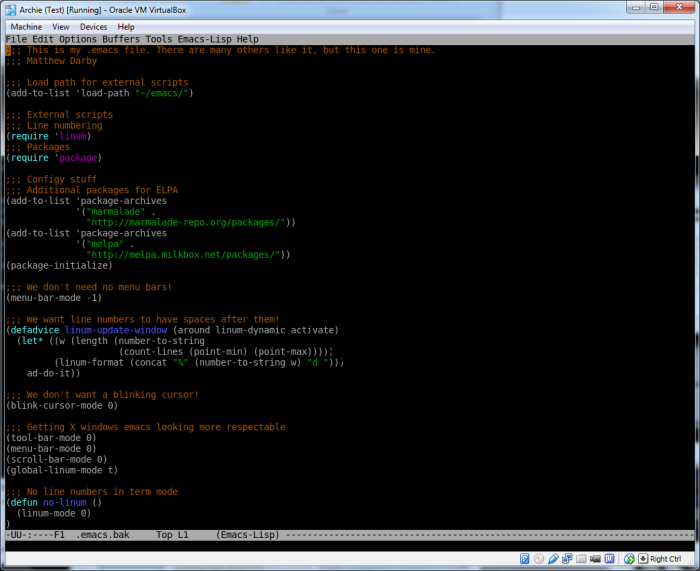
EmacsTerminalFresh2To be fair, that picture is also from the terminal version of emacs, but the point stands. What on earth is that menu bar doing up there? And in the X terminal version, there’s a scroll bar and a tool bar? Vim doesn’t need these things, and neither do I! They simply had to go:

GettingRidOfTheChaffAnd what of my wonderful Sublime Text colours? It turns out, someone had already made an emacs theme with pretty much the exact same colours as in Sublime Text’s monokai theme! They imaginatively called it monokai. I installed it via the package manager, added

(load-theme 'monokai t)

to my .emacs, and whoosh!

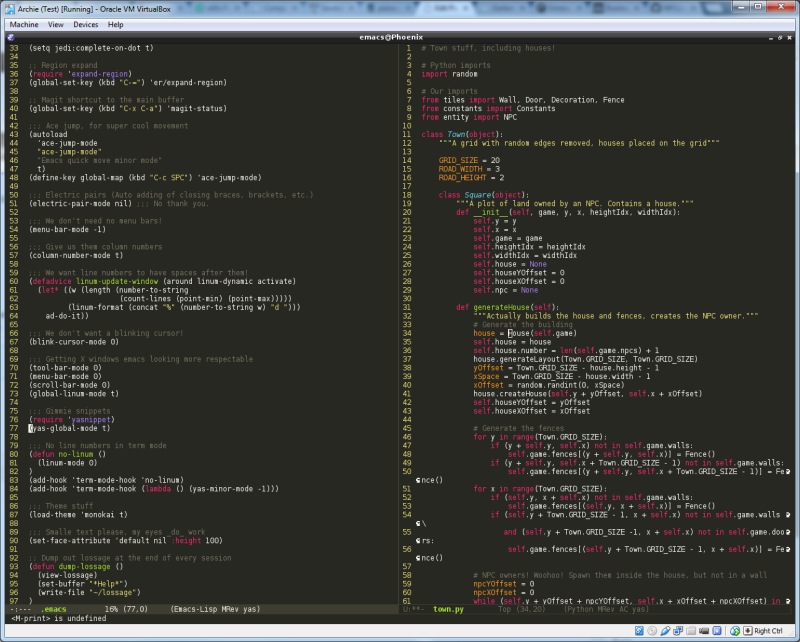
MonokaiThat is one sexy looking emacs set-up. Yes, there’s a couple of mistakes in my .emacs, but I’ll survive. Another little thing enabled here is column numbering in the status bar.

Those of you with eagle eyes will spot little things in the .emacs like yasnippet, magit and ace-jump-mode. Those are some very, very cool add-ons. I’d like to write a bit about those next time. For those who are really impatient, both yasnippet and ace-jump-mode have been subjects of Emacs Rocks! videos.

Getting Virtual with Emacs (Part 1)

A Quick Introduction

We’re taking a short (okay, long) break from the Hullet Bells posts. It’s already been a couple of months since I last updated, mostly because progress has been slow. I keep having ideas on how to refactor the fledging script system, but never get around to actually implementing them. So that’s on hold for now. In the meantime, I’ve been messing about with a couple of other things. Today, I’d like to write about my experiences with Oracle VirtualBox and Arch Linux. This isn’t going to be a tutorial on installing Arch on VirtualBox by any means. If you want that, you’d do well to check out Josh Braun’s excellent guide. When the ArchLinux beginner’s guide was not enough, Josh’s advice helped grease the wheels.

Oracle VirtualBox (or simply VirtualBox) is a virtual machine (or VM). For those unfamiliar with VMs, the concept is simple: Rather than install a second operating system via the traditional fashion of re-partitioning your hard-drive and modifying the boot loader so you can dual-boot, you run your standard operating system and boot the new one as a program inside it. The underlying operating system is called the ‘host’, and second operating system is known as the ‘guest’.

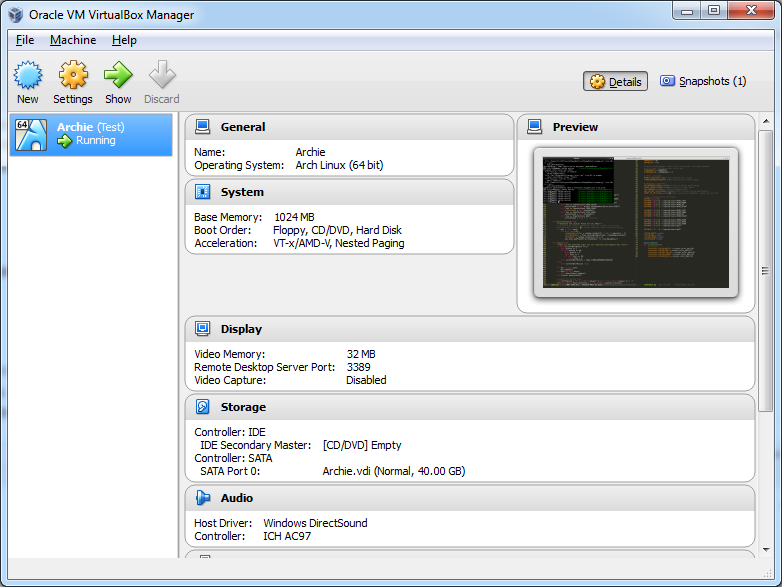
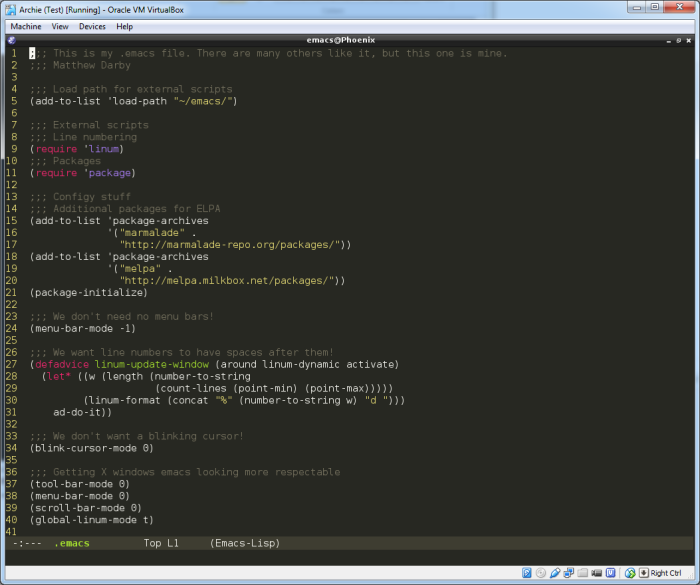
I’m running Windows (the host OS) with Sublime Text and VirtualBox open. Inside VirtualBox is an Arch Linux instance (the guest OS), running Openbox, Emacs, and Supertux. Why would anyone do this? Well, there’s plenty of legitimate reasons. For instance, as a developer you might want to test software on multiple platforms without having to drudge through rebooting or using a different machine every time you want to try something new. Or maybe you have some old applications that only run in an older version of Windows, and you’d like to use those without dusting off your ancient Dell. These are fine reasons, and there are many more. My reason was a little stranger..

I wanted to learn Emacs

Why learn GNU Emacs? Well, why not? I’m already pretty familiar with Vim, although I’m by no means a wizard. After watching a few videos of people working with Emacs, I figured maybe it was time to give it a go. I would be one of the brave, the few, to see what life was like on both sides of the editor war.

‘But Matthew,’ I hear you cry. ‘You don’t need to install Linux just to use Emacs!’ And you would be completely right. While I was toying with the idea of installing Emacs for Windows, I remembered another thing I wanted to get to grips with: Linux. I’ve had several abortive attempts over the years, usually lasting anywhere between a week to a couple of months. The high entry cost of having to leave behind Windows and its myriad useful applications ended up being too much to bear. But the future is here, and now I can run Linux in my Windows, so I can Linux while I Windows. So I decided to give both of them a go. But first I’d need a Virtual Machine to run Linux on..

Virtually a Machine

After Googling for all of thirty seconds, I came the open-source VM VirtualBox. There is an alternative in VMware Player. I picked VirtualBox simply because I had to pick between the two. It turned out to be a great choice, with almost no problems encountered at all.

VirtualBox
What’s that in the preview box?

The interface couldn’t be simpler. You can run as many virtual machines as your system can handle, and creating a new machine is as easy as clicking the New button and following the wizard. All you need to set up at first is the machine name, type (Linux, Windows, other), and version (Ubuntu, XP, OS/2, etc). Allocate it some amount of memory, specify some parameters about its virtual hard drive and bam! You’re done! Grab an ISO of your favourite Linux distribution, pop it in the virtual drive, boot up the machine..

ArchInstall

And install it just like you normally would, with a few special additions/omissions for doing it in VirtualBox. Again, I’m not about to provide a big ol’ tutorial. That’s already been done, and it’s been done very well. Some of the nice features you get when working with a supported VirtualBox OS:

  • Shared clipboard!
  • Ability to seamlessly move the mouse and keyboard between operating systems without having to explicitly regain control from the guest!
  • Other stuff I haven’t yet discovered!

It’s super simple and a pleasure to work with, at least for my current requirements.

Arch Linux

Why Arch? Well, I’m a big fan of lightweight stuff. Arch comes with just enough to get you going, and a great package manager (pacman) to help you get the stuff that you want. If you’re bit of a Linux penguin, you may understand my surprise at the fact I had to download sudo! That’s right, that’s how lightweight it is. Installation and initial set-up took me about half a day in total. This is keeping in mind I’m not very familiar with Linux installation, especially after such a long period between efforts.

One of the things I really like about running a virtual machine is that you don’t really have to worry about irrevocably screwing up your physical box. Things like disk partitioning are usually terrifying exercises in double, triple-checking your numbers, especially on a system that already has an OS installed. So without those worries, I was able to play about a bit and step out of my normal comfort zone. After that, it’s just going through the motions of installing the guest OS, enabling the network, setting the clock..

Then it was time to install Emacs. I took a deep breath and typed

sudo pacman -Sy emacs

and it was done!

Emacs on the Terminal

I ran through the Emacs tutorial in about an hour. I was amazed at how different the whole experience was from Vim. The look and feel were completely different, for one thing. A menu bar? Wow, I hadn’t seen one of those on a terminal editor since Edit! And the editing wasn’t modal like Vim: None of this switching between Normal and Edit mode. Of course, there were also little surprises. Yank means ‘paste’ in Emacs, while it meant ‘copy’ in Vim. There’s zero one-key short-cuts for things: Want to go to the start of the line you’re on? Ctrl+A will do it in Emacs, while ‘0’ will do it in Vim. Want to copy that line? ‘yy’ will do that for you in Vim. But you’ll need to either ‘mark’ (select) the line in Emacs and ‘kill’ (copy) it without deletion, or delete the whole line and ‘yank’ it back in, with the end result of the line being on Emac’s equivalent of the clipboard. The key sequences for these look like:

#1: Ctrl+a (go to start of line), Ctrl+Space (Place marker), Ctrl+e (Go to end of line), Meta+w (‘Kill’ without deletion)
#2: Ctrl+Shift+Backspace (‘Kill’ the line and delete it), Ctrl+y (‘Yank’ the line back)

Woah. All the simple things suddenly seemed very difficult. In reality, you get used to the extra keystrokes quite quickly. And if it really bothers you, there’s Emacs extensions and modes out there for making Emacs behave more like Vim! Which brings up a good point: Emacs is extensible. Like, crazy extensible. Thanks to its built-in language Elisp (Emacs Lisp, a Lisp dialect), it wouldn’t be hard to implement a single key-chord command that would perform one of the above methods. Indeed, the same thing could be accomplished with a macro (a recorded set of key presses), a bit of functionality common to both Vim and Emacs. In any case, moving on..

Here’s how Emacs looks on the terminal:

EmacsTerminalFresh2

Not super hot. I spent a lot of time trying to get custom themes working and looking good, but it’s not an easy task. Especially when Emacs only wants to work with 256 colours! After a lot of wasted time trying to get a full colour terminal (if you figure this out, let me know), I decided to just install Xorg.

Emacs in Openbox

Initially, I went with the safe choice: The Gnome Desktop Environment. I’d used it in the past, and it was pretty okay back then. But wow, does it take a long time to start-up? And you have to log-in, what a mess. I ditched that quickly and continued my adventure outside my comfort zone. I installed Openbox, a lightweight window manager. When I first booted it up, I didn’t realise it was loaded:

OpenBox
It’s very minimalist.

That’s it. That’s what Openbox looks like. A right click reveals a menu in which you can open up X programs normally. I’ll talk about Openbox a bit later, but first, here’s what Emacs looks like under X:

EmacsOpenbox2
Ah, much better

Quite different, right? If the colour scheme looks familiar, it’s because it was inspired by Sublime Text‘s monokai theme. Installing the theme was easy. I had to configure the in-built (as of March 2013) Emacs package manager to use the Melpa and Marmalade package repositories, and then just downloaded the theme via that! A quick config change in my .emacs file, and there we go. The comfortable look of Sublime Text, the power of Emacs.

Next time, I’ll be posting about my experiences with emacs so far. I’ll highlight a couple of interesting features and extensions that I like, and maybe even convince some of you to give emacs a shot!

The Hullet Bells – Part 5 (Valuing your Input)

What is Input Handling, anyway?
Handling input is the process of taking the player’s key presses and converting them to actions in game. Pygame supports two methods for doing this:
1) Examining the state of the keyboard directly each frame, which I’ll refer to as the key state method.
2) Key events, where the game pumps an event queue that is populated only when keys are pressed and released.
Typically, we will attach a function to a key state or event and it will be called when the key is pressed or held.

For the key state approach, the part of your main loop that deals with input will look something like this:

...
  keystates = pygame.key.get_pressed()
  if keystates[pygame.K_UP]:
    moveUp()
  if keystates[pygame.K_DOWN]:
    moveDown()
... continues for each key tested ...

Meanwhile, if you take a key event approach, it will look more like this:

...
  events = pygame.event.get()
  for event in events:
    if event.type == pygame.KEYDOWN:
      if event.key == pygame.K_UP:
        startMovingUp()
      elif event.key == pygame.K_DOWN:
        ...
    elif event.type == pygame.KEYUP:
      if event.key == pygame.K_UP:
        stopMovingUp()
      elif event.key == pygame.K_DOWN:
        ...
...

The first obvious difference is that we won’t check the keys we’re watching for in the key event approach until someone actually presses a key to populate the events variable. The second is that we have a different idea about how movement should be handled: On key down, it starts and will likely continue every frame until key up. The key state approach typically moves players directly (I say typically, because we’ll see later on that it’s not always the case), while the key event approach modifies the player’s velocity, letting the game loop sort out actually moving the player. The former (direct movement) is frowned upon for a reason I’ll touch on later.

The Big Problem with Key Events

With that out of the way, I’d like to talk about one of the interesting challenges when implementing a multi-handler system. Suppose a player is moving their ship to the left when he pauses the game (switching the handler). If the player lets go of the left key and unpauses the game, what is their expectation? Is it:

  1. The ship comes to a standstill after unpausing, or…
  2. The ship continues moving to the left, with further movements to the left doubling the player’s speed, with right key presses causing the movement to stop while the key is held?

I have a pretty good idea myself about what I’d expect. The latter is a pretty serious bug, and it’s one I’ve encountered over and over again.

The above problems are caused when using key events for actions that require both the key down (begin movement) and key up (end movement) events to be caught in pairs. We have issues when beginning a movement, but then the corresponding end movement event is lost. In some implementations of key events, this can be achieved by losing application focus while the key is held, releasing the key, then giving the application focus again. The end result is that the game believes the key is still held down when it is not! Another example using our handler system: holding right and pausing the game will switch the current handler to the pause screen. Letting go of the key then sends the key up event to the pause screen handler, and not the game screen: The key up is lost. When we return to the game, we’ll see the dreaded behaviour above.

A brief aside to discuss the underlying method of moving a ship around the screen: Something you learn from a few game programming websites is that you should never directly modify a player’s position as a result of input. Instead, input should modify the player’s velocity. That way, because you’ve been a good programmer and decoupled the input and game logic, the game itself will be able to decide if the velocity applied will affect a movement. It shouldn’t if the player is at the bounds of the game area, for instance, but directly moving the player means you lose the information about how the player got out of bounds, so they may not be correctly placed back on the field. So directly modifying position is out. The idea that helps solve this: Key down means you affect the player’s velocity in some way, key up means you reverse that change.

This is a great piece of advice when implementing the movement stuff for your game. A common pattern I’ve seen on game tutorial sites is to add to the player’s velocity on key down events, and to subtract the same value on key up. This unfortunately causes the problems described above if a large number of precautions aren’t taken, including but not limited to:

  • Making sure a key up is ignored if we haven’t seen a key down from that key
  • Maintaining a list of all held keys when switching between handlers (can be rolled in to the above)
  • Making sure any paired events don’t let one half of the pair fire more than once (two key downs in a row, say)
  • When switching between handlers, checking every key in the new handler, seeing if it is waiting for an event, and firing it if the key state has changed (not ideal, because this means the player will have to repress the button after unpausing, say)

It’s a lot of messing about. I might add, it’s not wrong either (when you correctly code the safeguards). It can be a pain to code, and the edge cases extend beyond what I’ve outlined above. As a result, I attempt to keep things simple: we should never require an event pair in the first place. Instead, for movement functionality traditionally provided by events, I instead use the key state: A map of each key to a boolean value, either true for pressed or false for released. Every frame I check if the left or right key is pressed, I add to the velocity as normal. However, rather than subtract when the key is lifted, I reset the velocity at the end of the game logic for that frame. Suddenly, all of the above problems disappear: with no events to miss, we can’t get the velocity in a weird state, especially when it is reset at the end of every frame anyway.

This introduces something that some might be considered a bug: Suppose the game runs at 60 FPS and I’m moving to the right. That is to say, I am holding the right key. If I release the key after I’ve moved that frame and before the next frame hold the key again, it would be as though I never let go of the key in the first place. Given that we’re running at 60FPS, that gives you roughly 0.0167 seconds to push it. Most likely, you simply can’t release and re-press that fast. Even if you could, under most scenarios this is not a problem. Indeed, for movement this is the exact same behaviour you’d see with key events: On the second frame you would see a key up and a key down event, with the net result of no change in your velocity. There are conceivably scenarios where this is a problem. Consider you could charge a shot by holding space, and fire by releasing. If the player wants to fire a shot and then begin charging a new one, the key event approach would win out: Space bar comes up, space bar comes down, so you get both events on the queue and they’re processed on frame 2. Under the key state approach, we wouldn’t fire the shot. Again, this is a bug, but we would only see the problem if the player is really, really, really fast. I can’t stress how fast he would have to be! They would have to be faster than this dude. So we sacrifice a small bit of functionality in the case where the player is faster at pushing buttons than the world champion. It’s a sacrifice I’m willing to make.

In actual fact, key events will fall over here for movement too: If you tap the right key and get the key down/key up within 0.0167 seconds, the net result will be no movement, just like the key state approach. Maybe it’s not so bad after all! At least for movement. But what about performance? As it turns out, I did some number-crunching on my desktop computer and came up with the following: It takes one millionth of a second more to watch 10 key states than it does to wait for any number of key events (which takes no time, really, because the event loop isn’t populated until you actually press things). I think that’s acceptable! And even on a non-monster machine, it’s not going to take up a significant amount of time compared to the rendering or actual proper game logic. If you want to compare the approaches, here’s a gist of what I did. You’ll need pygame to run it, of course.

So, we’re trading a millionth of a second and a little bit of velocity resetting logic for the peace-of-mind of not having to deal with the edge cases of the key event approach for paired events. I’d call that a fair trade. Hullet Bells runs on a hybrid system: Key state-based function calls for movement (and later shooting), and key events for rarer events like using a special attack or pausing the game. In fact, the input handler presented in the gist is the same one used in Hullet Bells! Yes, it has some pretty gnarly named functions (what’s all this talk about callbacks? They’re just functions!), but it is basically the complete implementation of the system. One limitation is that I have no support for key combinations (say, calling a function if two keys are pressed, rather than just one), but for Hullet Bells (and many shooting games) this is an acceptable limitation.

The Hullet Bells InputHandler

The goal of the InputHandler was to allow isolation of the input logic between handlers, and to make programming input stuff as painless as possible. As long as you’ve defined the logic you want behind a key, actually attaching it is as easy as making the following calls:

# For key states
self.inputHandler.addPerFrameCallback(self._moveUp, pygame.K_UP)
# For key events
self.inputHandler.addPerFrameCallback(self._startMoveUp, pygame.K_UP, KEYDOWN)
self.inputHandler.addPerFrameCallback(self._stopMoveUp, pygame.K_UP, KEYUP)

These cause the event/key to be put in to lists that are evaluated every time inputHandler.update() is called:

  events = pygame.event.get()
  for event in events:
    if event.type == pygame.KEYDOWN:
      for keydownCallback in self.keydownCallbacks:
        if keydownCallback.key == event.key:
          keydownCallback.callback()
    elif event.type == pygame.KEYUP:
      for keyupCallback in self.keyupCallbacks:
        if keyupCallback.key == event.key:
          keyupCallback.callback()
...
  keystates = pygame.key.get_pressed()
  for perframeCallback in self.perframeCallbacks:
    if keystates[perframeCallback.key]:
      perframeCallback.callback()

For the key event stuff, it has just occurred to me that it would be nicer to store all KEYDOWN etc. events in a map of [event -> (key, callback)]. Also, for key states it might be nice to attempt to call all functions related to pressed keys regardless of whether a function exists or not, then we can eliminate the if statement too.. Anyway, those are actions for another time! As it stands, the input handler runs pretty well, so I’m not exactly looking to optimise yet. For the complete code, you can check out the Github or the above gist.

This was far too long, and didn’t really go anywhere. But that pretty much covers everything I wanted to talk about: Input handling in general, some of the problems you might have, and finally, my own implementation using the pygame library. I’d love to say the next post will be about the scripting system, but I’ll have to finish that before I can write about it. So if I want to write a post before then, I’ll talk about the game handler itself as it stands.