Last time, we talked about the two emacs extensions I use to emulate my most used features of Sublime Text. Even a cursory look at the manual would show way more features than I even thought about using, but by learning basic editing in emacs I’m already able to fully switch over to the Gnu editor.
This time I’m going to write about the cool stuff I’ve installed in emacs that you don’t see in the standard Sublime installation. Maybe Sublime has support for some of these functions, but not out of the box.
Magit
Magit allows you to control git from inside emacs. ‘But Matt,’ I hear you cry, ‘I can just leave emacs if I want to do git stuff! Why do I need this package?’ If I had to give you a a good reasons.. The whole thing is a pleasant user experience. Magit itself manifests as a new buffer splitting your window, listing the current status of the repository. Asking for a diff gives you the diff in another buffer; committing causes the commit message to open in a new buffer.. It’s very self-contained inside emacs. You don’t have to leave emacs for any part of the staging/committing/pushing, so you never have to break your flow. Even if you want to run an arbitrary git subcommand, Magit has you covered: The ! command while in the Magit buffer lets you specify subcommand you want.
But why alt-tab out to your terminal, then type ‘git commit -a’ only to be thrown back in to emacs for the commit message? Then you have to go back to the terminal to type ‘git push’.. What a chore. With Magit, I can just hit my Magit key binding (C-x C-a), then ‘c’ for commit, ‘-a’ for ‘add all unstaged files’, ‘c’ again, and I’m in a buffer where I can write my commit message. Write the message followed by C-c C-c to complete the commit. Then I just have to type ‘P’ twice to push, enter my SSH key-phrase, and that’s it.
Sure, Magit is definitely more of a convenience package than something that will supplement your coding skills, but it’s such a great convenience I can’t see why you wouldn’t want to use it!
Yasnippet
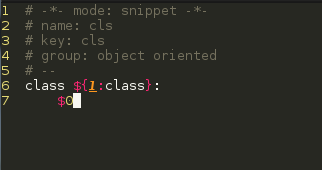
This one is a little unfair, because Sublime has support for snippets, and I just never really used them. Anyway: Yasnippet by João Távora allows you to use snippets when coding. Snippets are blocks of (usually) often used code that you can assign a shorthand command for. These commands take the form of a sequence of characters typed in to the editor followed by a tab. For instance, when writing Python I could type ‘cls’ followed by a tab and cls would be replaced by:
![]()
Emacs highlights ‘class’, ready for me to type the new class’ name. Once typed, I press tab again and I’m done. Snippets can contain more than one field to modify. In that case, tab moves you to the next field.
That happens to be one of the snippets you get when you first grab yasnippets via the package manager. It’s very simple to write your own, and dare I say, easier than writing the equivalent template in Sublime. The snippet above is defined like this:
If we wanted to save ourselves even more writing and not have to worry about writing the usual init function, we could modify it like so:
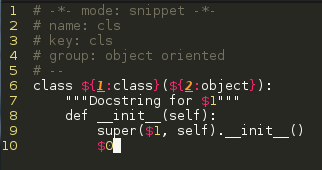
Notice how I’ve referenced $1 in two places and added a second field for us to potentially modify for when the new class is a subclass. By referencing a field more than once, the field is mirrored in other places. Expanding the snippet now gives this:
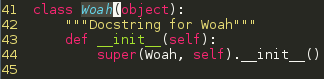
Notice how I’ve typed ‘Woah’ and it has automagically appeared in other places! Pretty cool. There’s a lot of potential in snippets to unlock, and they can save you from large amounts of typing. They’re a great feature to have, and I can’t wait to think up some useful snippets to improve my workflow.
Ace-jump-mode
One of the simplest packages on this list, ace-jump-mode by winterTTr is one of the most difficult to explain. Functionally, it’s a method of moving the cursor to the beginning of any word on the screen. The way you use it might seem weird at first, but it quickly becomes second nature. In this screenshot, my point is at the bottom of the screen but I want it to jump up to the creation of the Player object, because I just remembered I renamed that class.
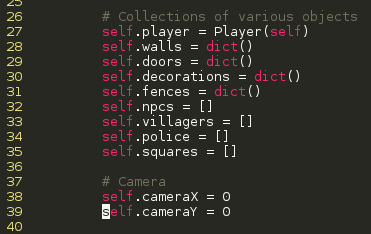
Rather than move the point all that way (a whole 12 lines, so much effort), I can activate ace-jump-mode with my key-binding (Ctrl+C SPC), type the first letter of the word I want to jump to, and bam:
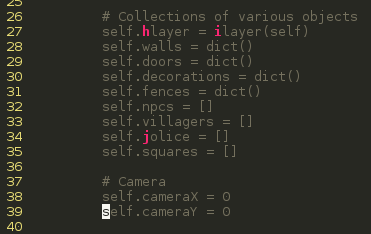
Ace-jump-mode now finds all instances of the chosen letter on the screen when it appears at the start of a word, and labels them with a letter of the alphabet. In this case, I want to jump to Player, so all I have to do is type ‘i’ and the point will jump to that location! I think it’s pretty neat in its simplicity, and saves some tedious point moving action you’d otherwise be doing.
That’s pretty much it! Before I finish this post, I’d like to take a little while to help out anyone having problems combining some of the packages discussed in these posts.
Jedi.el and multiple-cursors.el
These two packages get along quite well until you have multiple cursors active and decide to type a dot. Upon seeing a dot, Jedi.el decides to attempt to call auto-completion to help out with class methods and the like. However, multiple-cursors explicitly disables auto-complete mode because auto-complete doesn’t play well with it. The end result is that an error is thrown on typing dot, so only the first cursor actually types it. This is problematic, but I have a solution! In fact, I’ve submitted a pull request to the multiple-cursors.el repository that was recently merged. But for you people who don’t want to upgrade multiple-cursors to the latest pull or want to wait for a new release, here’s another solution that you can add to your .emacs after your normal multiple-cursors set-up:
(setq mc/unsupported-minor-modes '(auto-complete-mode flyspell-mode jedi-mode))
After adding this, you can type dots to your hearts content, even when using jedi.el! Enjoy.
Yasnippet and auto-complete.el
While not mentioned explicitly here or in the previous post, Jedi.el uses auto-complete.el for its auto-complete interface. Sometimes you’ll want snippets to appear in the auto-complete list. By default, auto-complete.el is coded to not include a yasnippet source. A source is just an abstraction that provides suggestions to auto-complete.el, with the actual method of finding said suggestions hidden inside the source itself. With a bit of tweaking, we can have snippets appear in all auto-complete suggestions regardless of mode by forcing the yasnippet source to be loaded in all modes. This is typically desirable behaviour, because if we have snippets for a mode, we usually want to use them! To do this, you need to add a hook to the auto-complete-mode in .emacs:
(defun ac-always-add-yasnippet-source ()
(add-to-list 'ac-sources 'ac-source-yasnippet))

(add-hook 'auto-complete-mode-hook 'ac-always-add-yasnippet-source)
Alternatively, you can add hooks on a per Major mode basis instead. For instance, you can add the same function as a hook to Python mode by replacing auto-complete-mode-hook by python-mode-hook.
That about wraps it up for this post. If I find a really cool emacs package that I have to shout about, I’ll be sure to mention it. Otherwise, next time we’ll be looking at Rogue Detective (working title), my really-kinda-lame-but-I-like-working-on-it Python roguelike developed in emacs!